มินิโปรเจค Arduino ควบคุม Servo Motor โดยใช้ Potentiometer
6 ปีที่ผ่านมา
มินิโปรเจค Arduino ควบคุม Servo Motor โดยใช้ Potentiometer
ประโยชน์และการนำโปรเจคไปพัฒนาต่อ
การควบคุมตำแหน่งของเซอร์โวมอเตอร์ (Servo Motor) นั้น มีความสำคัญในการสร้าง และ การพัฒนาสิ่งประดิษฐ์ต่างๆ ที่ต้องการควบคุมกลไก จากคอนโทรลเลอร์ รวมทั้งการพัฒนาชุดควบคุมหุ่นยนต์แขนกล , หุ่นยนต์ฮิวแมนนอยด์ (humanoid robot) เป็นต้น
เป้าหมายและหลักการทำงานของโปรเจค
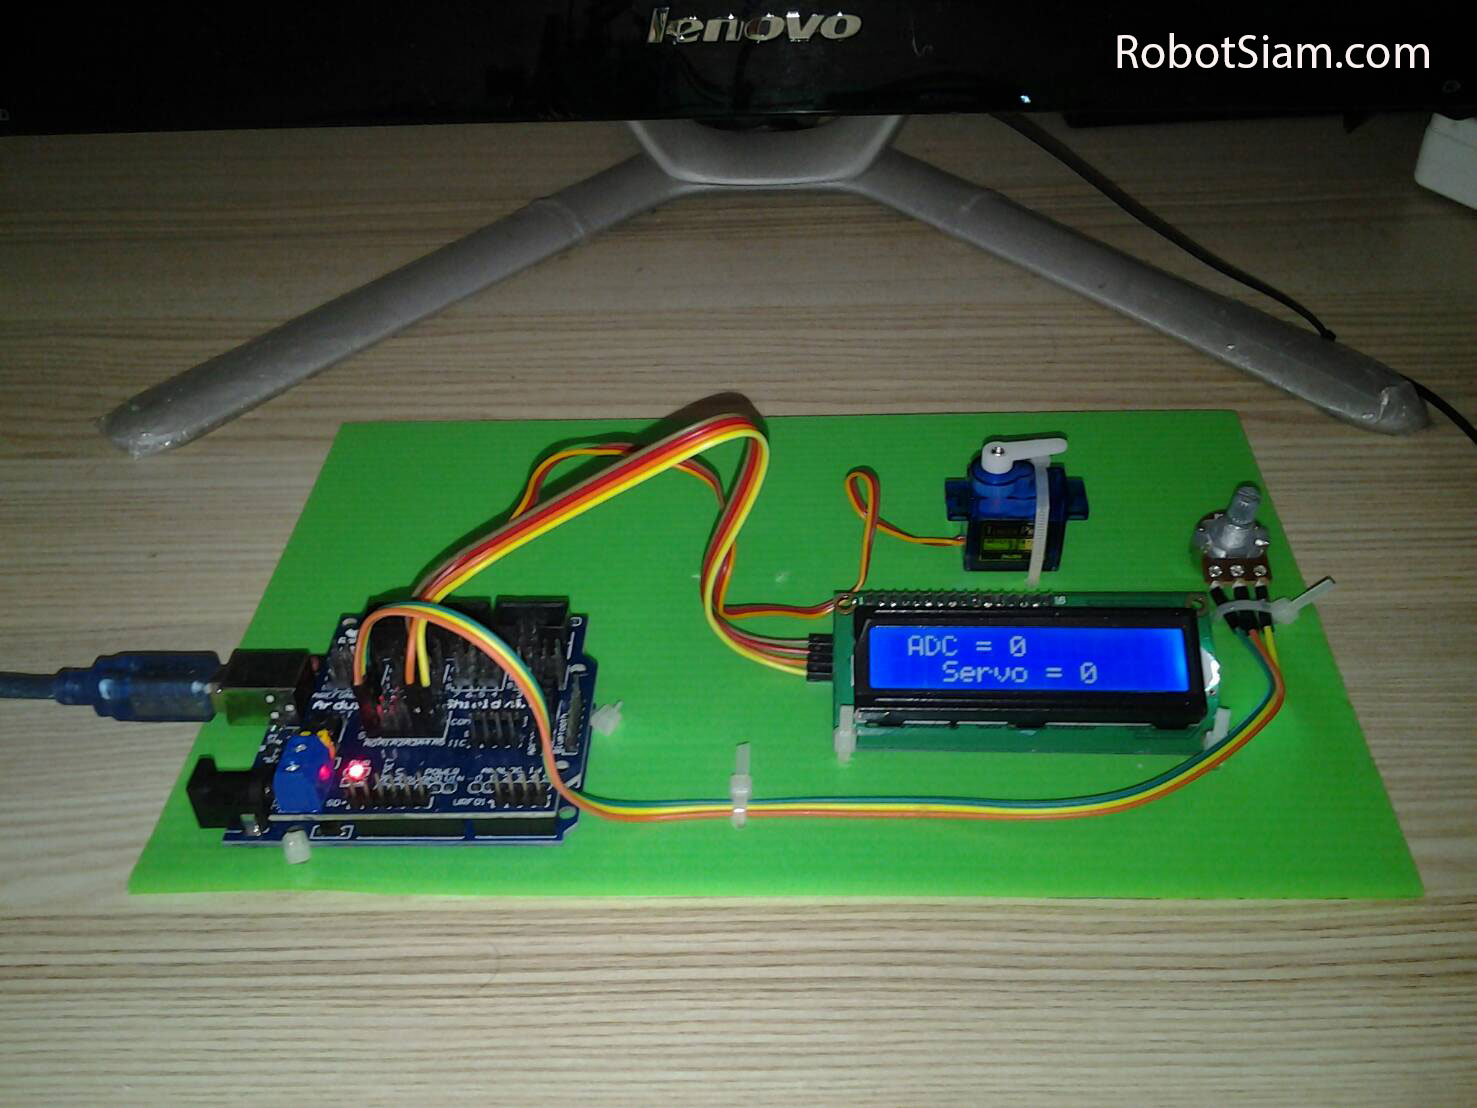
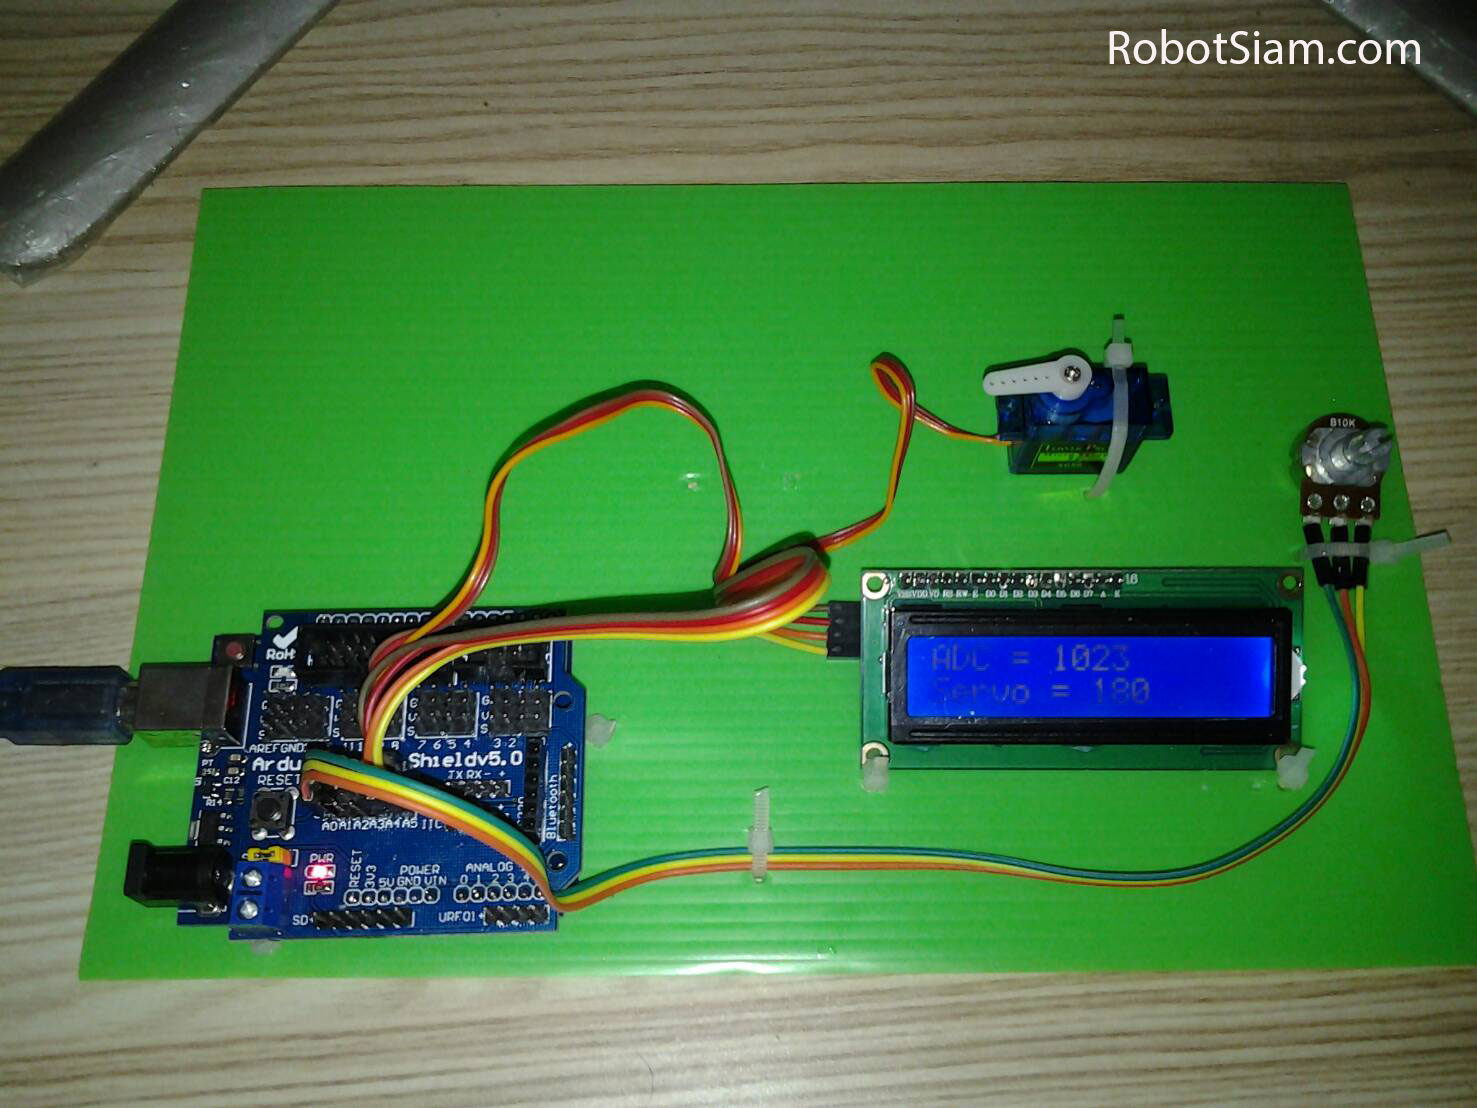
 ผลของการทำงานทำให้สามารถปรับตำแหน่งองศาของ Servo Motor ได้โดยการหมุนปรับค่า Potentiometer และแสดงค่าที่จอ LCD
ทดสอบโดย หมุน โพเทนซิโอมิเตอร์ (Potentiometer) ตัวต้านทานปรับค่าได้ 10K Ohm หรืออาจจะเรียกสั้นๆว่า “pot” ซึ่งเป็นอุปกรณ์ที่มีสามขา ปรับค่าได้ ที่ต่ออยู่ที่ Pin อนาล็อก A0 ของ Arduino เมื่ออ่านค่าอินพุท แบบ อนาล็อก (Analog) แล้วเก็บค่าไว้ในตัวแปร
แต่เนื่องจาก การแปลงค่าจาก อนาล็อก เป็น ดิจิตอล (Analog to Digital Converter) หรือเรียกสั้นๆว่า ADC ของ Arduino นั้นเป็น ADC ขนาด 10-bit จึงอ่านค่า Analog ได้ตั้งแต่ 0 – 1023 แต่ Servo Motor สามารถหมุนได้เพียงแค่ 0 - 180 องศา จึงต้องแปลงค่า เพื่อทำการสเกลค่าลงจาก 0 - 1023 ให้เป็น 0 - 180 แล้วนำไปเก็บไว้ในตัวแปรอีกครั้ง
แล้วให้จอ LCD แถวบนแสดงผลค่าของตัวแปร ADC ที่ยังไม่ได้แปลงค่า และแถวล่างแสดงผลค่าของตัวแปร ADC ที่แปลงค่าเป็นองศาของ Servo ส่วนที่ Pin ดิจิตอล (Digital) หมายเลข 9 เป็นเอาท์พุท ที่สั่งให้ Servo Motor หมุนไปยังตำแหน่งตามค่าตัวแปร ADC ที่แปลงค่าเป็นองศาของ Servo แล้วเช่นกัน
รู้จัก Servo Motor
Servo เป็นคำศัพท์ที่ใช้กันทั่วไปในระบบควบคุมอัตโนมัติ มาจากภาษาละตินคำว่า Sevus หมายถึง “ทาส” (Slave) ในเชิงความหมายของ Servo Motor ก็คือ Motor ที่เราสามารถสั่งงานหรือตั้งค่า แล้วตัว Motor จะหมุนไปยังตำแหน่งองศาที่เราสั่งได้เองอย่างถูกต้อง โดยใช้การควบคุมแบบป้อนกลับ (Feedback Control)
ส่วนประกอบภายนอก Servo Motor

เซอร์โวชุดนี้มีขนาดเล็กแรงบิด 1.2-1.4 KG/cm สีน้ำตาลเป็นสายกราวด์ สีแดงเป็นไฟเข้า 4.8-7.2V สีส้มเป็นสัญญาณอินพุต หมุนได้ 180 องศา ส่วนใหญ่ต่อเข้ากับ Pin ดิจิตอล (Digital) ของ Arduino UNO ที่เป็น Pin ที่สามารถใช้งาน PWM Signal ได้ เช่น 3 , 5 , 6 , 9 , 10 , 11
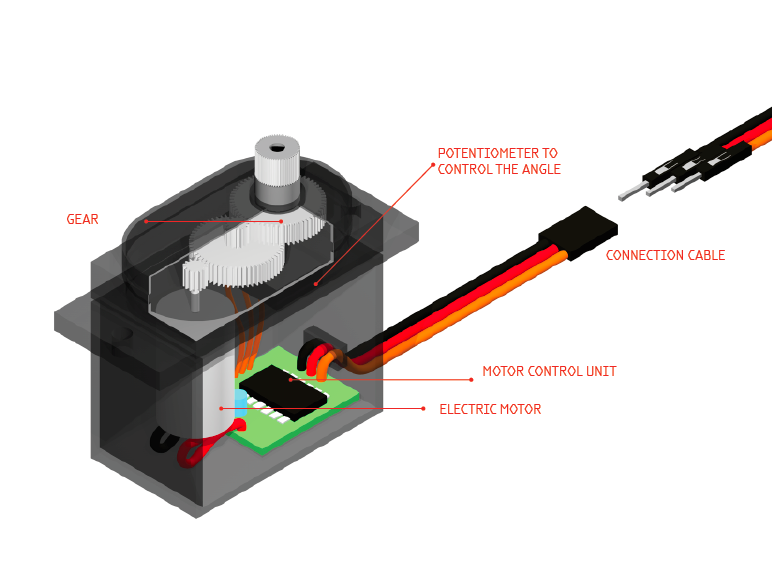
ส่วนประกอบภายใน Servo Motor

1. ELECTRIC MOTOR เป็นส่วนของตัวมอเตอร์
2. MOTOR CONTROL UNIT เป็นส่วนที่ควบคุมและประมวลผล
3. CONNETION CABLE เป็นส่วนเชื่อมต่อสายสัญญาณพัลซ์ควบคุมและสายไฟเลี้ยง
4. POTENTIOMETER TO CONTROL THE ANGLE เป็นส่วนควบคุมองศาในการหมุน
5. GEAR เป็นส่วนชุดเกียร์ทดแรง
อุปกรณ์ที่ใช้ในโปรเจค
5. SG90 Tower Pro Micro Servo motor
6 . ตัวต้านทานปรับค่าได้ 10k ohm
*** การใช้งานแบบไม่ต้องการเชื่อมต่อสาย USB กับ คอมพิวเตอร์ ให้ใช้ Adapter DC 9V 1A Power Supply เป็นแหล่งจ่ายไฟ เสียบเข้ากับ DC Power Jack ของ บอร์ด Arduino ***
ขั้นตอนการทำโปรเจค
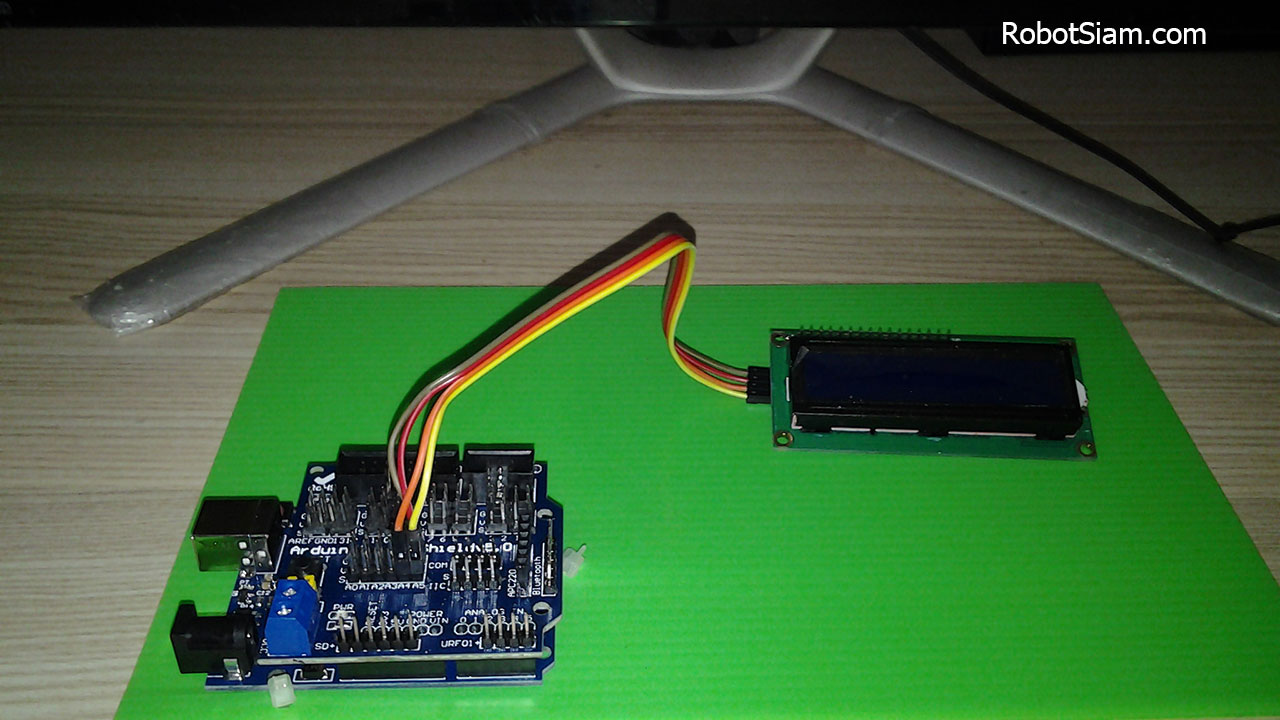
1. ต่อใช้งาน จอ LCD กับ Arduino
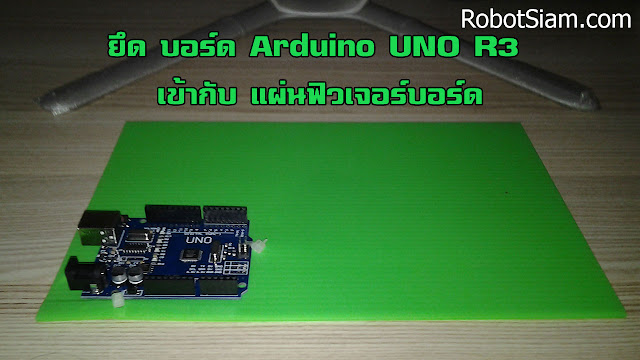
1.1 ยึดบอร์ด Arduino UNO
1.2 ประกอบ Sensor Shield V 5.0

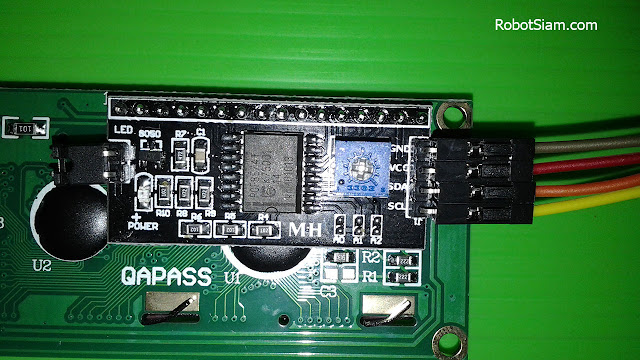
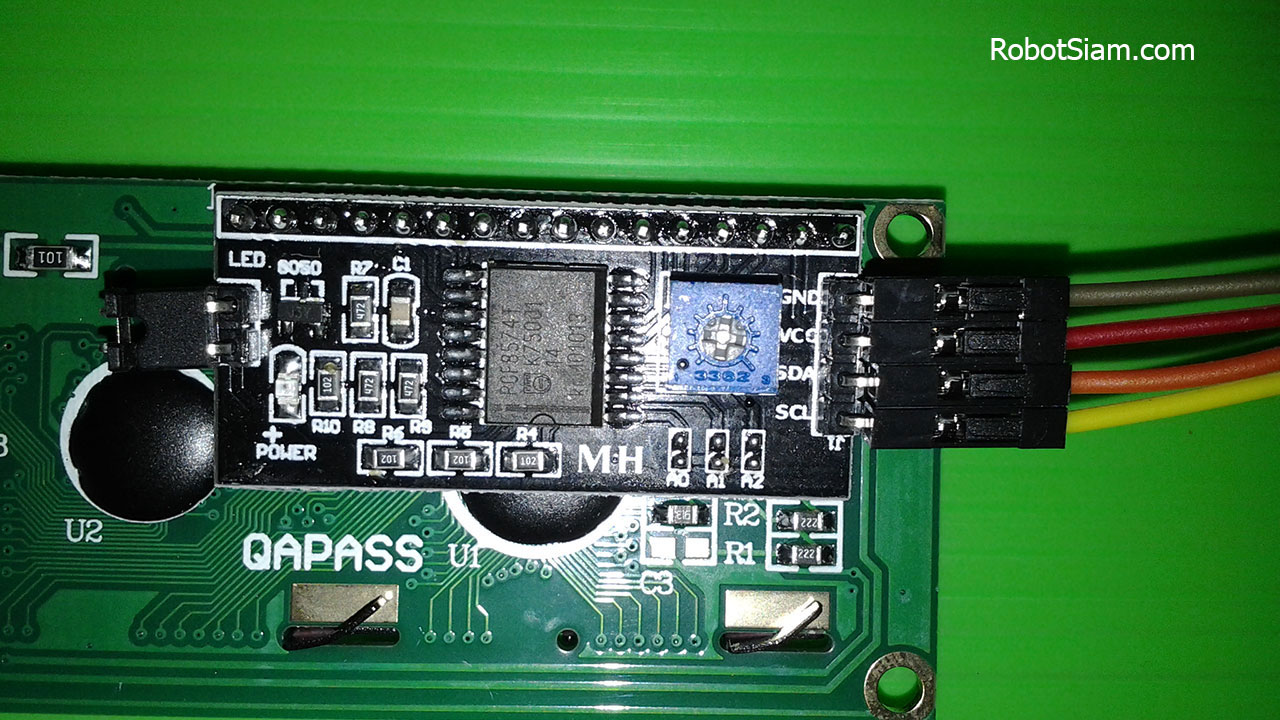
1.3 เชื่อมต่อสาย LCD


1.4 ดาวน์โหลด Arduino I2C Library สำหรับ LCD
https://github.com/fdebrabander/Arduino-LiquidCrystal-I2C-library
1.5 ติดตั้ง I2C Library สำหรับ LCD
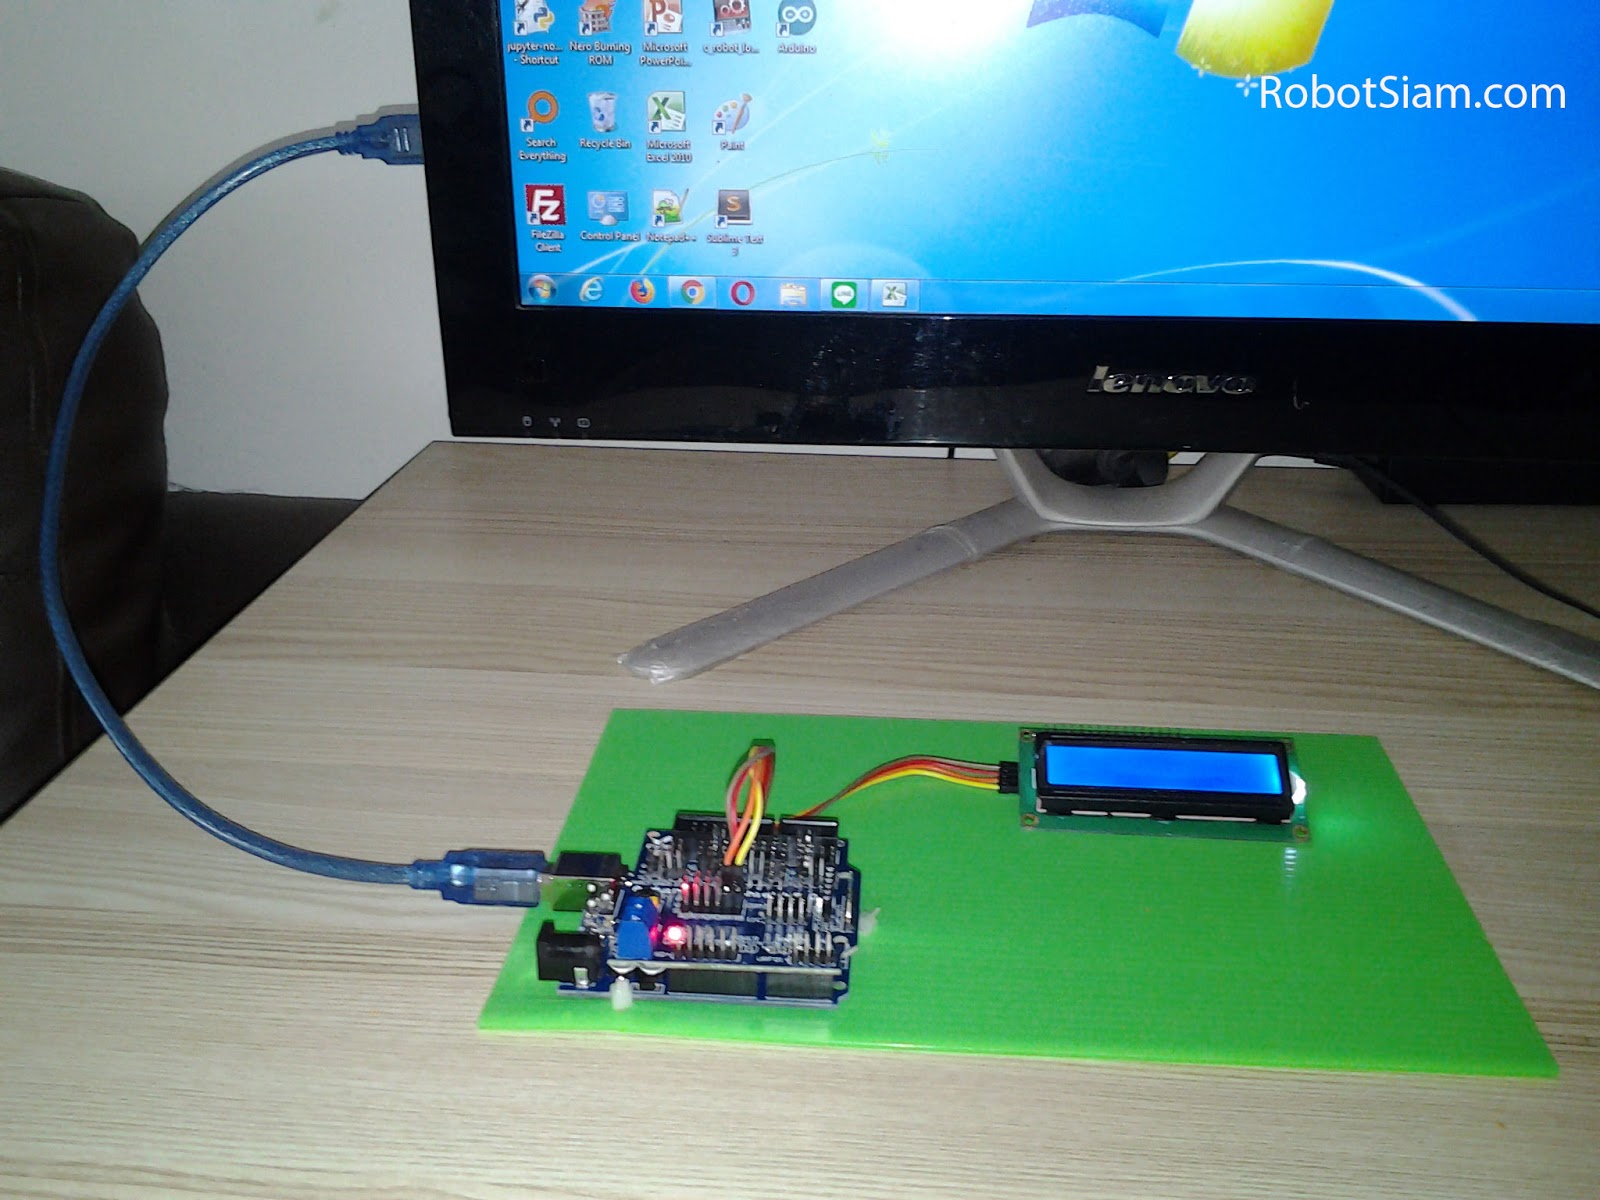
1.5.1 เชื่อมต่อสาย USB ระหว่าง คอมพิวเตอร์ กับ บอร์ด Arduino

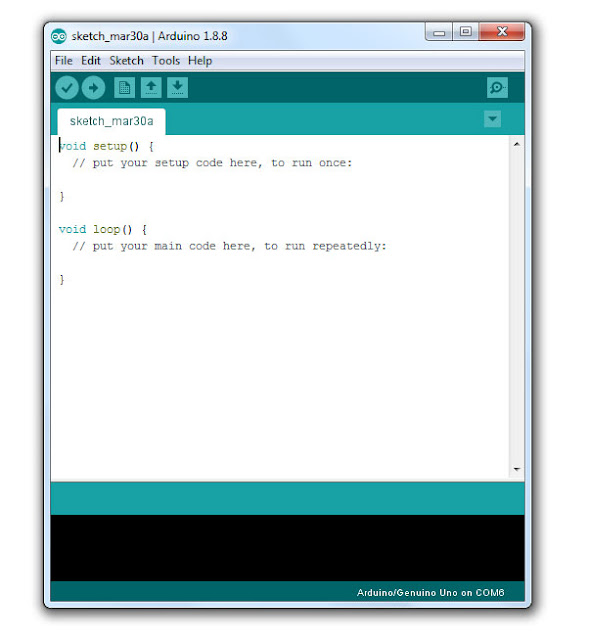
1.5.2 เปิดโปรแกรม Arduino IDE
1.5.3 ไปที่ Skecth -> Include Library -> Add .ZIP Library...

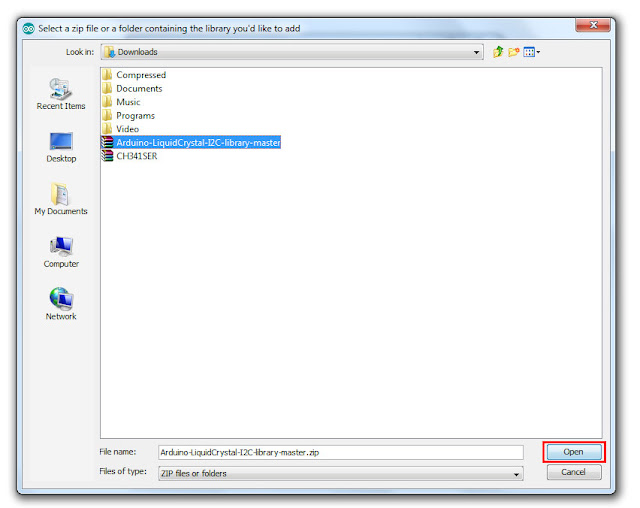
1.5.4 ไปที่ ไลบรารี Arduino-LiquidCrystal-I2C-library-master.zip ที่เรา ดาวน์โหลด มา -> Open
 1.5.5 ตรวจสอบที่ Skecth -> Include Library จะพบ ไลบรารี Arduino-LiquidCrystal-I2C-library-master เพิ่มเข้ามาใน Arduino IDE ของเรา
 1.6 อัพโหลดโค้ด
1.6.1 เขียนโค้ดดังนี้
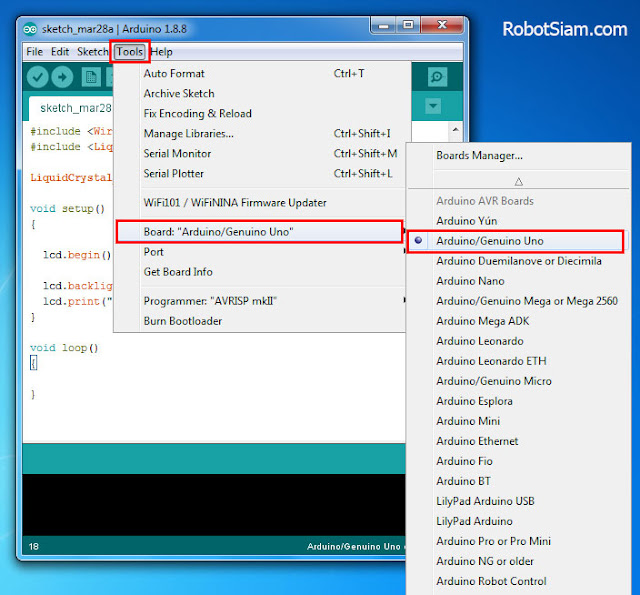
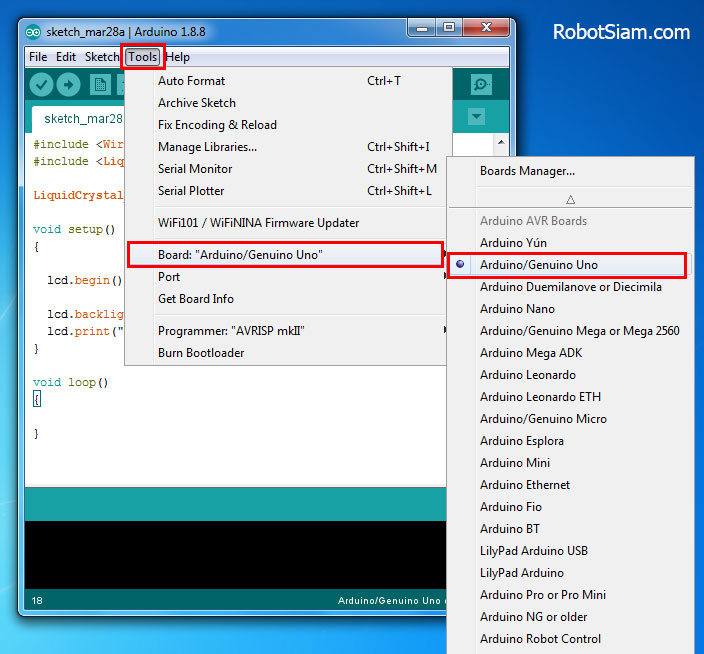
1.6.2 ไปที่ Tools > Board เลือกเป็น Arduino/Genuino UNO
1.6.3 ไปที่ Tools > Port แล้วเลือกพอร์ตที่ปรากฏ (กรณีใช้เครื่องคอมพิวเตอร์ที่มี COM Port มากกว่าหนึ่ง ให้เลือกตัวอื่นที่ไม่ใช่ COM1)
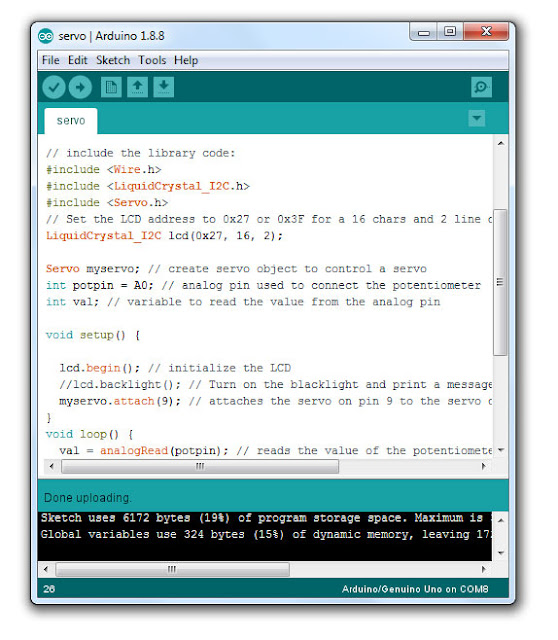
ในตัวอย่างเลือกเป็น "COM6"
(ถ้ายังว่าง หรือ เป็น COM1 ให้ตรวจสอบการติดตั้งไดร์เวอร์ การต่อสาย USB ของ Arduino UNO)
 1.6.4 กดปุ่ม
  เพื่ออัพโหลด

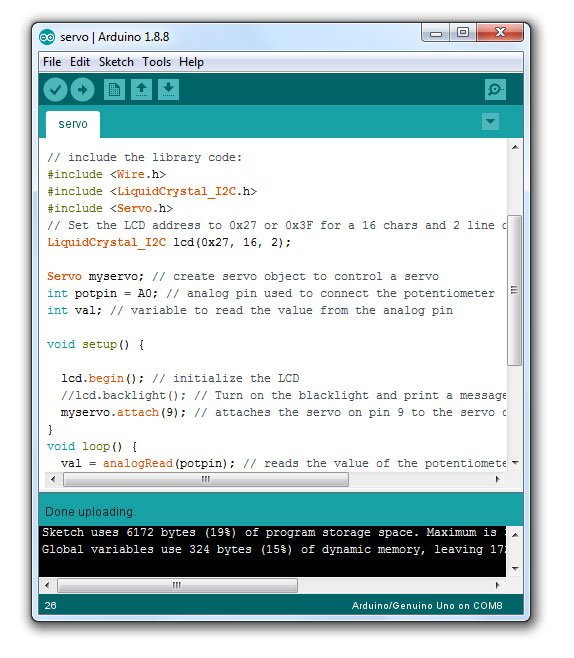
1.6.5 หากสามารถอัพโหลดโปรแกรมลงบอร์ดได้สำเร็จ จะแสดงคำว่า Done uploading. ที่แถบด้านล่าง

1.7 ปรับความสว่างหน้าจอ LCD


2. เชื่อมต่อสาย ตัวต้านทานปรับค่าได้ 10k Ohm (VR)

3. เชื่อมต่อสาย Servo Motor

4.1 อธิบายโค้ด
อ่านค่า Analog จาก Potentiometer ที่ต่ออยู่ที่ขา A0 เก็บไว้ในตัวแปร val
lcd.print("ADC = " + String(val));
แสดงค่า 0 – 1023 ที่จอ LCD
val = map(val, 0, 1023, 0, 180);
เนื่องจาก ADC ภายใน Arduino เป็น ADC ขนาด 10-bit จึงอ่านค่า Analog ได้ตั้งแต่ 0 – 1023 แต่ RC Servo Motor สามารถหมุนได้เพียงแค่ 0 - 180 องศา จึงต้องใช้ Function map เพื่อทำการสเกลค่าลงจาก 0 - 1023 เป็น 0 - 180 แล้วนำไปเก็บไว้ในตัวแปร val
lcd.print("Servo = " + String(val));
myservo.write(val);
เมื่อสเกลค่า จาก 0-1023 ลงเหลือ 0-180 แล้วก็นำมาสั่งให้ Servo Motor หมุนไปยังตำแหน่งในค่าตัวแปร val
delay(15);
หน่วงเวลา 15 มิลลิวินาที.
ผลของการทำงานทำให้สามารถปรับตำแหน่งองศาของ Servo Motor ได้โดยการหมุนปรับค่า Potentiometer และแสดงค่าที่จอ LCD

ประโยชน์และการนำโปรเจคไปพัฒนาต่อ
การควบคุมตำแหน่งของเซอร์โวมอเตอร์ (Servo Motor) นั้น มีความสำคัญในการสร้าง และ การพัฒนาสิ่งประดิษฐ์ต่างๆ ที่ต้องการควบคุมกลไก จากคอนโทรลเลอร์ รวมทั้งการพัฒนาชุดควบคุมหุ่นยนต์แขนกล , หุ่นยนต์ฮิวแมนนอยด์ (humanoid robot) เป็นต้น
เป้าหมายและหลักการทำงานของโปรเจค
ทดสอบโดย หมุน โพเทนซิโอมิเตอร์ (Potentiometer) ตัวต้านทานปรับค่าได้ 10K Ohm หรืออาจจะเรียกสั้นๆว่า “pot” ซึ่งเป็นอุปกรณ์ที่มีสามขา ปรับค่าได้ ที่ต่ออยู่ที่ Pin อนาล็อก A0 ของ Arduino เมื่ออ่านค่าอินพุท แบบ อนาล็อก (Analog) แล้วเก็บค่าไว้ในตัวแปร
แต่เนื่องจาก การแปลงค่าจาก อนาล็อก เป็น ดิจิตอล (Analog to Digital Converter) หรือเรียกสั้นๆว่า ADC ของ Arduino นั้นเป็น ADC ขนาด 10-bit จึงอ่านค่า Analog ได้ตั้งแต่ 0 – 1023 แต่ Servo Motor สามารถหมุนได้เพียงแค่ 0 - 180 องศา จึงต้องแปลงค่า เพื่อทำการสเกลค่าลงจาก 0 - 1023 ให้เป็น 0 - 180 แล้วนำไปเก็บไว้ในตัวแปรอีกครั้ง
แล้วให้จอ LCD แถวบนแสดงผลค่าของตัวแปร ADC ที่ยังไม่ได้แปลงค่า และแถวล่างแสดงผลค่าของตัวแปร ADC ที่แปลงค่าเป็นองศาของ Servo ส่วนที่ Pin ดิจิตอล (Digital) หมายเลข 9 เป็นเอาท์พุท ที่สั่งให้ Servo Motor หมุนไปยังตำแหน่งตามค่าตัวแปร ADC ที่แปลงค่าเป็นองศาของ Servo แล้วเช่นกัน
รู้จัก Servo Motor
Servo เป็นคำศัพท์ที่ใช้กันทั่วไปในระบบควบคุมอัตโนมัติ มาจากภาษาละตินคำว่า Sevus หมายถึง “ทาส” (Slave) ในเชิงความหมายของ Servo Motor ก็คือ Motor ที่เราสามารถสั่งงานหรือตั้งค่า แล้วตัว Motor จะหมุนไปยังตำแหน่งองศาที่เราสั่งได้เองอย่างถูกต้อง โดยใช้การควบคุมแบบป้อนกลับ (Feedback Control)
ส่วนประกอบภายนอก Servo Motor

เซอร์โวชุดนี้มีขนาดเล็กแรงบิด 1.2-1.4 KG/cm สีน้ำตาลเป็นสายกราวด์ สีแดงเป็นไฟเข้า 4.8-7.2V สีส้มเป็นสัญญาณอินพุต หมุนได้ 180 องศา ส่วนใหญ่ต่อเข้ากับ Pin ดิจิตอล (Digital) ของ Arduino UNO ที่เป็น Pin ที่สามารถใช้งาน PWM Signal ได้ เช่น 3 , 5 , 6 , 9 , 10 , 11
ส่วนประกอบภายใน Servo Motor
1. ELECTRIC MOTOR เป็นส่วนของตัวมอเตอร์
2. MOTOR CONTROL UNIT เป็นส่วนที่ควบคุมและประมวลผล
3. CONNETION CABLE เป็นส่วนเชื่อมต่อสายสัญญาณพัลซ์ควบคุมและสายไฟเลี้ยง
4. POTENTIOMETER TO CONTROL THE ANGLE เป็นส่วนควบคุมองศาในการหมุน
5. GEAR เป็นส่วนชุดเกียร์ทดแรง
อุปกรณ์ที่ใช้ในโปรเจค
5. SG90 Tower Pro Micro Servo motor
6 . ตัวต้านทานปรับค่าได้ 10k ohm
*** การใช้งานแบบไม่ต้องการเชื่อมต่อสาย USB กับ คอมพิวเตอร์ ให้ใช้ Adapter DC 9V 1A Power Supply เป็นแหล่งจ่ายไฟ เสียบเข้ากับ DC Power Jack ของ บอร์ด Arduino ***
ขั้นตอนการทำโปรเจค
1. ต่อใช้งาน จอ LCD กับ Arduino
1.1 ยึดบอร์ด Arduino UNO

1.2 ประกอบ Sensor Shield V 5.0

1.3 เชื่อมต่อสาย LCD

1.4 ดาวน์โหลด Arduino I2C Library สำหรับ LCD
https://github.com/fdebrabander/Arduino-LiquidCrystal-I2C-library
1.5 ติดตั้ง I2C Library สำหรับ LCD
1.5.1 เชื่อมต่อสาย USB ระหว่าง คอมพิวเตอร์ กับ บอร์ด Arduino
1.5.2 เปิดโปรแกรม Arduino IDE

1.5.3 ไปที่ Skecth -> Include Library -> Add .ZIP Library...

1.5.4 ไปที่ ไลบรารี Arduino-LiquidCrystal-I2C-library-master.zip ที่เรา ดาวน์โหลด มา -> Open


1.6.1 เขียนโค้ดดังนี้
#include <Wire.h>
#include <LiquidCrystal_I2C.h>

LiquidCrystal_I2C lcd(0x27, 16, 2);

void setup()
{

lcd.begin();

lcd.backlight();
lcd.print("Hello, world!");
}

void loop()
{

}
1.6.2 ไปที่ Tools > Board เลือกเป็น Arduino/Genuino UNO
1.6.3 ไปที่ Tools > Port แล้วเลือกพอร์ตที่ปรากฏ (กรณีใช้เครื่องคอมพิวเตอร์ที่มี COM Port มากกว่าหนึ่ง ให้เลือกตัวอื่นที่ไม่ใช่ COM1)
ในตัวอย่างเลือกเป็น "COM6"
(ถ้ายังว่าง หรือ เป็น COM1 ให้ตรวจสอบการติดตั้งไดร์เวอร์ การต่อสาย USB ของ Arduino UNO)
 เพื่ออัพโหลด
1.6.5 หากสามารถอัพโหลดโปรแกรมลงบอร์ดได้สำเร็จ จะแสดงคำว่า Done uploading. ที่แถบด้านล่าง

1.7 ปรับความสว่างหน้าจอ LCD


2. เชื่อมต่อสาย ตัวต้านทานปรับค่าได้ 10k Ohm (VR)

3. เชื่อมต่อสาย Servo Motor

4. อัพโหลดโค้ด
/*
Servo Motor Control with Potentiometer Arduino.

For more details visit:

https://miniarduino.blogspot.com/2019/03/arduino-servo-motor-potentiometer.html

*/


// include the library code:

#include <Wire.h>

#include <LiquidCrystal_I2C.h>

#include <Servo.h>

// Set the LCD address to 0x27 or 0x3F for a 16 chars and 2 line display

LiquidCrystal_I2C lcd(0x27, 16, 2);


Servo myservo; // create servo object to control a servo

int potpin = A0; // analog pin used to connect the potentiometer

int val; // variable to read the value from the analog pin


void setup() {


lcd.begin(); // initialize the LCD

lcd.backlight(); // Turn on the blacklight and print a message.

myservo.attach(9); // attaches the servo on pin 9 to the servo object

}

void loop() {

val = analogRead(potpin); // reads the value of the potentiometer (value // between 0 and 1023)

lcd.setCursor(0, 0); // set the cursor to column 0, line 0

lcd.print("ADC = " + String(val)); // print (value // between 0 and 1023) to the LCD.

val = map(val, 0, 1023, 0, 180); // scale it to use it with the servo value

lcd.setCursor(0, 1); // set the cursor to column 0, line 1

lcd.print("Servo = " + String(val)); // print (value // between 0 and 180) to the LCD.


// between 0 and 180)

myservo.write(val); // sets the servo position according to the

// scaled value

delay(15); // waits for the servo to get there

}
4.1 อธิบายโค้ด
val = analogRead(potpin);
อ่านค่า Analog จาก Potentiometer ที่ต่ออยู่ที่ขา A0 เก็บไว้ในตัวแปร val
lcd.print("ADC = " + String(val));
แสดงค่า 0 – 1023 ที่จอ LCD
val = map(val, 0, 1023, 0, 180);
เนื่องจาก ADC ภายใน Arduino เป็น ADC ขนาด 10-bit จึงอ่านค่า Analog ได้ตั้งแต่ 0 – 1023 แต่ RC Servo Motor สามารถหมุนได้เพียงแค่ 0 - 180 องศา จึงต้องใช้ Function map เพื่อทำการสเกลค่าลงจาก 0 - 1023 เป็น 0 - 180 แล้วนำไปเก็บไว้ในตัวแปร val
lcd.print("Servo = " + String(val));
แสดงค่า 0 – 180 ที่จอ LCD
myservo.write(val);
เมื่อสเกลค่า จาก 0-1023 ลงเหลือ 0-180 แล้วก็นำมาสั่งให้ Servo Motor หมุนไปยังตำแหน่งในค่าตัวแปร val
delay(15);
หน่วงเวลา 15 มิลลิวินาที.
ผลของการทำงานทำให้สามารถปรับตำแหน่งองศาของ Servo Motor ได้โดยการหมุนปรับค่า Potentiometer และแสดงค่าที่จอ LCD
5. ปัญหาที่พบในโปรเจคนี้
การปรับค่า Potentiometer ให้ Servo Motor หมุนได้ 180 องศาไม่มีปัญหา แต่ในการปรับค่า Potentiometer ให้ Servo Motor หมุนได้จนถึง 0 องศานั้นไม่สามารถทำได้ในบางครั้ง น่าจะเกิดจาก คุณสมบัติหรือคุณภาพ ของ Potentiometer ตัวที่เลือกใช้งาน
การปรับค่า Potentiometer ให้ Servo Motor หมุนได้ 180 องศาไม่มีปัญหา แต่ในการปรับค่า Potentiometer ให้ Servo Motor หมุนได้จนถึง 0 องศานั้นไม่สามารถทำได้ในบางครั้ง น่าจะเกิดจาก คุณสมบัติหรือคุณภาพ ของ Potentiometer ตัวที่เลือกใช้งาน

BLOG

โปรเจค Arduino 3 in 1 หรี่ไฟบ้าน 220V ด้วยแอปมือถือ / ด้วยขวดโค๊ก / ด้วยท่าทางมือ
1 ปีที่ผ่านมา
ชุดคิท Arduino 3 in 1 หรี่ไฟบ้าน 220V ด้วย แอปมือถือ / ขวดโค๊ก / ท่าทางมือ (Gestures) การเรียนรู้การสร้างระบบหรี่ไฟบ้าน 220V โดยใช้ Arduino มีข้อดีหลายประการ ดังนี้: พัฒนาทักษะด้านอิเล็กทรอนิกส์: การสร้างระบบนี้ช่วยให้คุณได้ฝึกทักษะการทำงานกับวงจรไฟฟ…
1 ปีที่ผ่านมา
ชุดคิท Arduino 3 in 1 หรี่ไฟบ้าน 220V ด้วย แอปมือถือ / ขวดโค๊ก / ท่าทางมือ (Gestures) การเรียนรู้การสร้างระบบหรี่ไฟบ้าน 220V โดยใช้ Arduino มีข้อดีหลายประการ ดังนี้: พัฒนาทักษะด้านอิเล็กทรอนิกส์: การสร้างระบบนี้ช่วยให้คุณได้ฝึกทักษะการทำงานกับวงจรไฟฟ…
โปรเจค ESP32 เปิด-ปิดไฟบ้าน 220V ผ่านอินเตอร์เน็ต ได้ทั่วโลก ด้วย Blynk 2.0
1 ปีที่ผ่านมา
ชุดคิท IoT ESP32 2 in 1 เปิดปิดไฟ ผ่าน อินเตอร์เน็ต ด้วย BLYNK / ESP Rainmaker Blynk คือ แพลตฟอร์ม IoT ที่ช่วยให้ผู้ใช้สามารถควบคุมและติดตามอุปกรณ์ผ่านอินเทอร์เน็ตได้ง่าย ๆ โดยไม่ต้องเขียนโค้ดซับซ้อน มีแอปพลิเคชันบนสมาร์ทโฟนที่สามารถออกแบบ UI เพื่อคว…
1 ปีที่ผ่านมา
ชุดคิท IoT ESP32 2 in 1 เปิดปิดไฟ ผ่าน อินเตอร์เน็ต ด้วย BLYNK / ESP Rainmaker Blynk คือ แพลตฟอร์ม IoT ที่ช่วยให้ผู้ใช้สามารถควบคุมและติดตามอุปกรณ์ผ่านอินเทอร์เน็ตได้ง่าย ๆ โดยไม่ต้องเขียนโค้ดซับซ้อน มีแอปพลิเคชันบนสมาร์ทโฟนที่สามารถออกแบบ UI เพื่อคว…

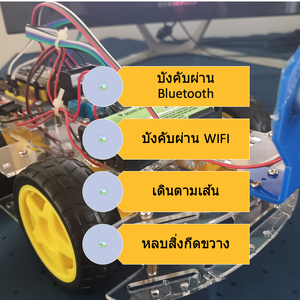
โปรเจค หุ่นยนต์ Arduino 4in1 - บังคับด้วยแอพ / ควบคุมด้วยเสียงปรบมือ / เดินตามเส้น / หลบสิ่งกีดขวาง
1 ปีที่ผ่านมา
ชุดคิท หุ่นยนต์ Arduino 4in1 - บังคับด้วยแอพ / ควบคุมด้วยเสียงปรบมือ / เดินตามเส้น / หลบสิ่งกีดขวาง แบบ DIY (มี ขั้นตอนวิธีทำ และ โค้ด)ชุดคิท หุ่นยนต์ Arduino 4in1 ชุดนี้ สามารถ ทดสอบ ทำโปรเจค ได้หลากหลายรูปแบบ เหมาะสำหรับ โรงเรียน สถานศึกษา ใช้ในการ…
1 ปีที่ผ่านมา
ชุดคิท หุ่นยนต์ Arduino 4in1 - บังคับด้วยแอพ / ควบคุมด้วยเสียงปรบมือ / เดินตามเส้น / หลบสิ่งกีดขวาง แบบ DIY (มี ขั้นตอนวิธีทำ และ โค้ด)ชุดคิท หุ่นยนต์ Arduino 4in1 ชุดนี้ สามารถ ทดสอบ ทำโปรเจค ได้หลากหลายรูปแบบ เหมาะสำหรับ โรงเรียน สถานศึกษา ใช้ในการ…
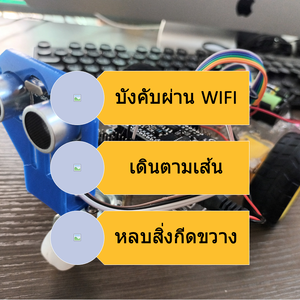
โปรเจค หุ่นยนต์ ESP8266 3in1 - บังคับผ่าน WIFI / เดินตามเส้น / หลบสิ่งกีดขวาง
1 ปีที่ผ่านมา
ชุดคิท หุ่นยนต์ ESP8266 3in1 - บังคับผ่าน WIFI / เดินตามเส้น / หลบสิ่งกีดขวาง แบบ DIY (มี ขั้นตอนวิธีทำ และ โค้ด)ชุดคิท หุ่นยนต์ ESP8266 V3 3in1 ชุดนี้ สามารถ ทดสอบ ทำโปรเจค ได้หลากหลายรูปแบบ เหมาะสำหรับ โรงเรียน สถานศึกษา ใช้ในการเรียนรู้การสร้างหุ่…
1 ปีที่ผ่านมา
ชุดคิท หุ่นยนต์ ESP8266 3in1 - บังคับผ่าน WIFI / เดินตามเส้น / หลบสิ่งกีดขวาง แบบ DIY (มี ขั้นตอนวิธีทำ และ โค้ด)ชุดคิท หุ่นยนต์ ESP8266 V3 3in1 ชุดนี้ สามารถ ทดสอบ ทำโปรเจค ได้หลากหลายรูปแบบ เหมาะสำหรับ โรงเรียน สถานศึกษา ใช้ในการเรียนรู้การสร้างหุ่…
โปรเจค หุ่นยนต์ ESP32 5 in 1 - บังคับผ่าน Bluetooth / บังคับผ่าน WIFI / บังคับผ่านอินเตอร์เน็ต / เดินตามเส้น / หลบสิ่งกีดขวาง
1 ปีที่ผ่านมา
ชุดคิท หุ่นยนต์ ESP32 5 in 1 - บังคับผ่าน Bluetooth / บังคับผ่าน WIFI / บังคับ ผ่านอินเตอร์เน็ต/ เดินตามเส้น / หลบสิ่งกีดขวาง แบบ DIY (มี ขั้นตอนวิธีทำ และ โค้ด)ชุดคิท หุ่นยนต์ ESP32 4in1 ชุดนี้ สามารถ ทดสอบ ทำโปรเจค ได้หลากหลายรูปแบบ เหมาะสำหรับ โรง…
1 ปีที่ผ่านมา
ชุดคิท หุ่นยนต์ ESP32 5 in 1 - บังคับผ่าน Bluetooth / บังคับผ่าน WIFI / บังคับ ผ่านอินเตอร์เน็ต/ เดินตามเส้น / หลบสิ่งกีดขวาง แบบ DIY (มี ขั้นตอนวิธีทำ และ โค้ด)ชุดคิท หุ่นยนต์ ESP32 4in1 ชุดนี้ สามารถ ทดสอบ ทำโปรเจค ได้หลากหลายรูปแบบ เหมาะสำหรับ โรง…
โปรเจค ESP32 เปิด-ปิดไฟ ผ่านอินเตอร์เน็ตด้วย ESP Rainmaker
2 ปีที่ผ่านมา
ESP RainMaker เป็นแพลตฟอร์มที่ช่วยให้นักพัฒนาสร้างอุปกรณ์ที่เชื่อมต่อกับ ESP32-S2 SoC ของ Espressif โดยไม่ต้องวุ่นวายกับการจัดการโครงสร้างพื้นฐาน มี SDK ของอุปกรณ์ แอปโทรศัพท์ที่ปรับเปลี่ยนได้เอง มิดเดิลแวร์คลาวด์แบบโปร่งใส และยูทิลิตีโฮสต์เพื่อลดควา…
2 ปีที่ผ่านมา
ESP RainMaker เป็นแพลตฟอร์มที่ช่วยให้นักพัฒนาสร้างอุปกรณ์ที่เชื่อมต่อกับ ESP32-S2 SoC ของ Espressif โดยไม่ต้องวุ่นวายกับการจัดการโครงสร้างพื้นฐาน มี SDK ของอุปกรณ์ แอปโทรศัพท์ที่ปรับเปลี่ยนได้เอง มิดเดิลแวร์คลาวด์แบบโปร่งใส และยูทิลิตีโฮสต์เพื่อลดควา…

โปรเจค Arduino เปิด-ปิดไฟ ด้วย โทรศัพท์ ผ่าน แอพบลูทูธ
2 ปีที่ผ่านมา
โปรเจค Arduino: เปิด-ปิดไฟด้วย โทรศัพท์ ผ่าน แอพบลูทูธ การควบคุมการเปิด-ปิดไฟในบ้านหรือสถานที่ต่าง ๆ ได้ง่ายขึ้นด้วยการใช้ Arduino ร่วมกับบลูทูธ. ในบทความนี้, เราจะสร้างโปรเจคที่ใช้ Arduino เพื่อควบคุมไฟผ่านแอพบลูทูธบนโทรศัพท์มือถือของเรา. การทำโปรเจ…
2 ปีที่ผ่านมา
โปรเจค Arduino: เปิด-ปิดไฟด้วย โทรศัพท์ ผ่าน แอพบลูทูธ การควบคุมการเปิด-ปิดไฟในบ้านหรือสถานที่ต่าง ๆ ได้ง่ายขึ้นด้วยการใช้ Arduino ร่วมกับบลูทูธ. ในบทความนี้, เราจะสร้างโปรเจคที่ใช้ Arduino เพื่อควบคุมไฟผ่านแอพบลูทูธบนโทรศัพท์มือถือของเรา. การทำโปรเจ…
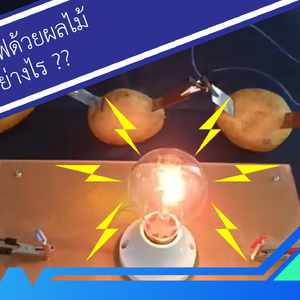
โปรเจค Arduino ไฟฟ้าจากผลไม้ กับ หลอดไฟ 220 โวลต์
2 ปีที่ผ่านมา
สอนทำโปรเจค Arduino ไฟฟ้าจากผลไม้ กับ หลอดไฟ 220 โวลต์ "ทดลองไฟฟ้าจากผลไม้" เป็นการทดลองทางวิทยาศาสตร์ที่น่าสนใจเพื่อศึกษาและทดสอบกระบวนการผลิตไฟฟ้าโดยใช้มันฝรั่งในฐานะวัตถุดิบหลัก. การทดลองนี้มุ่งเน้นการเรียนรู้และทำความเข้าใจถึงพลังงานที่เกิดขึ้นจา…
2 ปีที่ผ่านมา
สอนทำโปรเจค Arduino ไฟฟ้าจากผลไม้ กับ หลอดไฟ 220 โวลต์ "ทดลองไฟฟ้าจากผลไม้" เป็นการทดลองทางวิทยาศาสตร์ที่น่าสนใจเพื่อศึกษาและทดสอบกระบวนการผลิตไฟฟ้าโดยใช้มันฝรั่งในฐานะวัตถุดิบหลัก. การทดลองนี้มุ่งเน้นการเรียนรู้และทำความเข้าใจถึงพลังงานที่เกิดขึ้นจา…
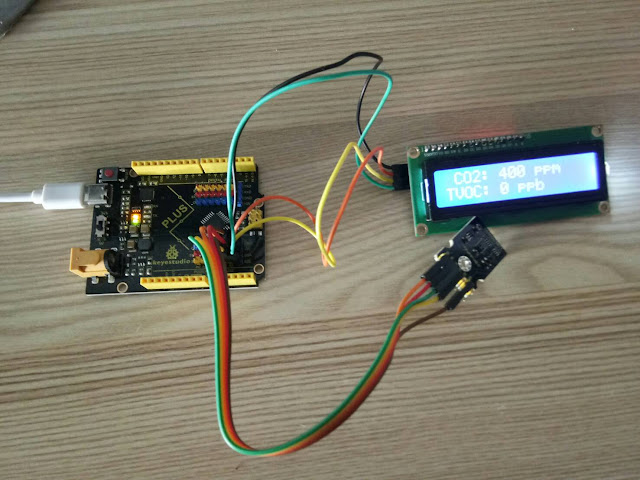
มินิโปรเจค Arduino วัดก๊าซคาร์บอนไดออกไซด์ แสดงผลที่จอ LCD
4 ปีที่ผ่านมา
ระดับคาร์บอนไดออกไซด์ปกติ (Normal CO2 Levels) ระดับคาร์บอนไดออกไซด์ปกติผลกระทบของ CO2 ต่อผู้ใหญ่ที่มีสุขภาพที่ดีสามารถสรุปได้ดังนี้-ระดับกลางแจ้งปกติ: 350 – 450 ppm-ระดับที่ยอมรับได้: <600 ppm=”” span=””>-ข้อร้องเร…
4 ปีที่ผ่านมา
ระดับคาร์บอนไดออกไซด์ปกติ (Normal CO2 Levels) ระดับคาร์บอนไดออกไซด์ปกติผลกระทบของ CO2 ต่อผู้ใหญ่ที่มีสุขภาพที่ดีสามารถสรุปได้ดังนี้-ระดับกลางแจ้งปกติ: 350 – 450 ppm-ระดับที่ยอมรับได้: <600 ppm=”” span=””>-ข้อร้องเร…
มินิโปรเจค Arduino เครื่องวัดฝุ่น PM2.5 ด้วย เซ็นเซอร์ GP2Y1014AU
4 ปีที่ผ่านมา
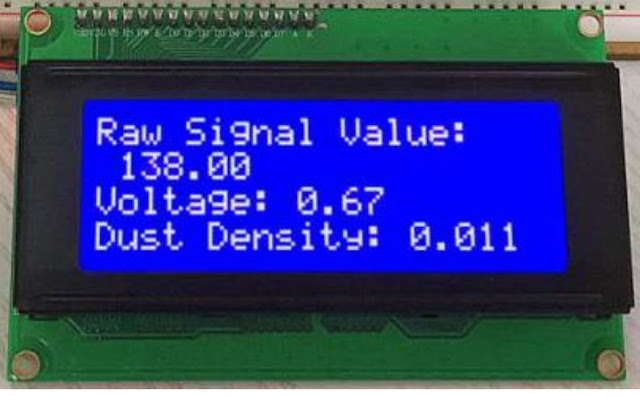
เครื่องวัดฝุ่น PM2.5 ด้วย เซ็นเซอร์ GP2Y1014AU บทความนี้ กล่าวถึงขั้นตอนการทำงานโปรเจค เครื่องวัดฝุ่น PM2.5 กับ Arduino UNO โดยใช้ เซ็นเซอร์วัดฝุ่น PM2.5 Keyestudio GP2Y1014AU ของ Sharp เซ็นเซอร์ฝุ่นนี้มีขนาดเล็กและสามารถตรวจจับฝุ่นละอองและอนุภาคควัน…
4 ปีที่ผ่านมา
เครื่องวัดฝุ่น PM2.5 ด้วย เซ็นเซอร์ GP2Y1014AU บทความนี้ กล่าวถึงขั้นตอนการทำงานโปรเจค เครื่องวัดฝุ่น PM2.5 กับ Arduino UNO โดยใช้ เซ็นเซอร์วัดฝุ่น PM2.5 Keyestudio GP2Y1014AU ของ Sharp เซ็นเซอร์ฝุ่นนี้มีขนาดเล็กและสามารถตรวจจับฝุ่นละอองและอนุภาคควัน…
มินิโปรเจค Arduino หรี่ไฟ AC 220V ผ่านบลูทูธ ด้วย App Android
5 ปีที่ผ่านมา
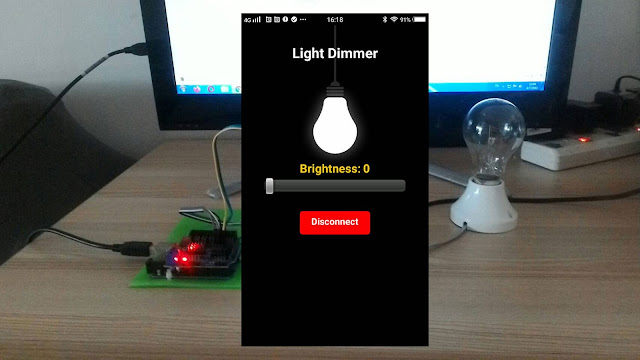
หรี่ไฟ AC 220V ผ่านบลูทูธ ด้วย App Android เป้าหมายและหลักการทำงานของโปรเจค ต้องการหรี่ไฟ หรือควบคุมแสงสว่างของหลอดไฟหรืออุปกรณ์ไฟฟ้าอื่นๆ แบบไร้สายผ่านโทรศัพท์มือถือด้วยแอพแอนดรอยด์ (App Android) เพื่อเป็นการประหยัดพลังงาน และความสะดวกในการควบคุม ซึ…
5 ปีที่ผ่านมา
หรี่ไฟ AC 220V ผ่านบลูทูธ ด้วย App Android เป้าหมายและหลักการทำงานของโปรเจค ต้องการหรี่ไฟ หรือควบคุมแสงสว่างของหลอดไฟหรืออุปกรณ์ไฟฟ้าอื่นๆ แบบไร้สายผ่านโทรศัพท์มือถือด้วยแอพแอนดรอยด์ (App Android) เพื่อเป็นการประหยัดพลังงาน และความสะดวกในการควบคุม ซึ…

มินิโปรเจค สร้างเกม Endless Runner ด้วย Arduino และ จอ LCD
5 ปีที่ผ่านมา
มินิโปรเจค สร้างเกม Endless Runner ด้วย Arduino และ จอ LCD การสร้างเกม ก็คือการเขียนโปรแกรมแบบหนึ่ง ให้แสดงผลถี่ๆ แล้วเขียนโปรแกรมให้การแสดงผลในแต่ละครั้ง ค่อยๆทำให้ตัวละครในภาพค่อยๆขยับ โดยการทำการเปลี่ยนภาพ หรือเคลื่อนที่ตัวละคร ก็จะเกิดการเคลื่อนไ…
5 ปีที่ผ่านมา
มินิโปรเจค สร้างเกม Endless Runner ด้วย Arduino และ จอ LCD การสร้างเกม ก็คือการเขียนโปรแกรมแบบหนึ่ง ให้แสดงผลถี่ๆ แล้วเขียนโปรแกรมให้การแสดงผลในแต่ละครั้ง ค่อยๆทำให้ตัวละครในภาพค่อยๆขยับ โดยการทำการเปลี่ยนภาพ หรือเคลื่อนที่ตัวละคร ก็จะเกิดการเคลื่อนไ…
โปรเจค IoT ESP8266 วัดอุณหภูมิ บันทึกลงดาต้าเบส MySQL
5 ปีที่ผ่านมา
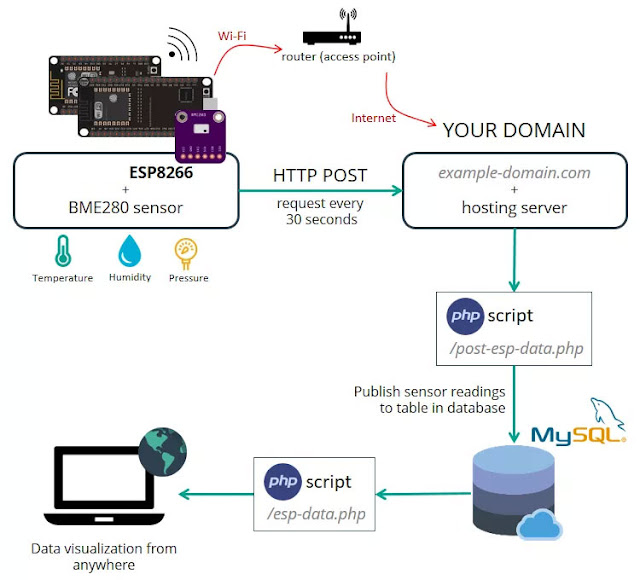
เป้าหมายของโปรเจคนี้คือเราต้องดูข้อมูลด้วยการเข้าถึงโดเมน ของเราเอง ไม่ว่าจะอยู่ส่วนไหนของโลก โดย ESP8266 จะสร้างไคลเอ็นต์ ที่ทำให้คำขอ HTTP POST ไปยังสคริปต์ PHP เพื่อแทรกข้อมูล (การอ่านเซ็นเซอร์) ลงในฐานข้อมูล MySQLโดยบทความนี้จะแสดงการส่งข้อมูลจาก…
5 ปีที่ผ่านมา
เป้าหมายของโปรเจคนี้คือเราต้องดูข้อมูลด้วยการเข้าถึงโดเมน ของเราเอง ไม่ว่าจะอยู่ส่วนไหนของโลก โดย ESP8266 จะสร้างไคลเอ็นต์ ที่ทำให้คำขอ HTTP POST ไปยังสคริปต์ PHP เพื่อแทรกข้อมูล (การอ่านเซ็นเซอร์) ลงในฐานข้อมูล MySQLโดยบทความนี้จะแสดงการส่งข้อมูลจาก…
มินิโปรเจค Arduino เปิดปิดไฟ 220V และ หรี่ไฟบ้านด้วยเสียง
5 ปีที่ผ่านมา
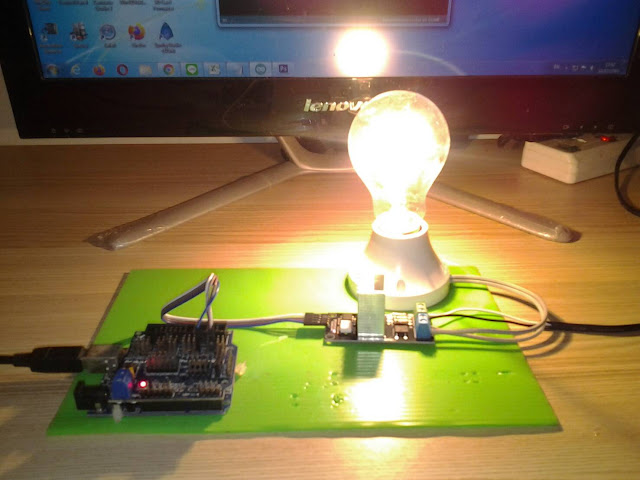
ควบคุมการติด-ดับ และ หรี่แสงสว่างหลอดไฟด้วยเสียงปรบมือ แนะนำ : ชุดประกอบสำเร็จ Arduino ควบคุมการติด-ดับ และ หรี่แสงสว่างหลอดไฟด้วยเสียงปรบมือ การทำ มินิโปรเจค Arduino เปิดปิดไฟ 220V และ หรี่ไฟบ้านด้วยเสียง เป้าหมายและหลักการทำงานของโปรเจค ต้องการควบค…
5 ปีที่ผ่านมา
ควบคุมการติด-ดับ และ หรี่แสงสว่างหลอดไฟด้วยเสียงปรบมือ แนะนำ : ชุดประกอบสำเร็จ Arduino ควบคุมการติด-ดับ และ หรี่แสงสว่างหลอดไฟด้วยเสียงปรบมือ การทำ มินิโปรเจค Arduino เปิดปิดไฟ 220V และ หรี่ไฟบ้านด้วยเสียง เป้าหมายและหลักการทำงานของโปรเจค ต้องการควบค…

โปรเจค ESP32-CAM กล้องดักถ่ายภาพอัตโนมัติ ด้วย PIR Motion
5 ปีที่ผ่านมา
โปรเจค ESP32-CAM กล้องดักถ่ายภาพอัตโนมัติ ด้วย PIR Motion โดยโปรเจคนี้ สามารถประยุกต์เป็นกล้องดักถ่ายภาพเมื่อมีผู้บุกรุก หรือเป็นกล้องดักถ่ายภาพสัตว์ มีชื่อเรียกหลายชื่อได้แก่ Trail Cam, Scout Cam, Camera Trap โดยผู้ใช้งานโดยซ่อนไว้ใกล้บริเวณทางที่สั…
5 ปีที่ผ่านมา
โปรเจค ESP32-CAM กล้องดักถ่ายภาพอัตโนมัติ ด้วย PIR Motion โดยโปรเจคนี้ สามารถประยุกต์เป็นกล้องดักถ่ายภาพเมื่อมีผู้บุกรุก หรือเป็นกล้องดักถ่ายภาพสัตว์ มีชื่อเรียกหลายชื่อได้แก่ Trail Cam, Scout Cam, Camera Trap โดยผู้ใช้งานโดยซ่อนไว้ใกล้บริเวณทางที่สั…
มินิโปรเจค Arduino อ่านค่าสี เล่นไฟล์เสียงจาก SD Card ออกลำโพง
6 ปีที่ผ่านมา
มินิโปรเจค Arduino อ่านค่าสี เล่นไฟล์เสียงจาก SD Card ออกลำโพง โปรเจค Arduino พูดโต้ตอบได้ โดยการเล่นไฟล์เสียงจาก SD Card บทความนี้จะสอนใช้งาน Arduino เล่นไฟล์เสียงจาก SD Card ออกลำโพง เราสามารถอัดเสียงพูดหรือบันทึกเสียงเพลงลง SD Card แล้ว สั่งงานให้…
6 ปีที่ผ่านมา
มินิโปรเจค Arduino อ่านค่าสี เล่นไฟล์เสียงจาก SD Card ออกลำโพง โปรเจค Arduino พูดโต้ตอบได้ โดยการเล่นไฟล์เสียงจาก SD Card บทความนี้จะสอนใช้งาน Arduino เล่นไฟล์เสียงจาก SD Card ออกลำโพง เราสามารถอัดเสียงพูดหรือบันทึกเสียงเพลงลง SD Card แล้ว สั่งงานให้…
 โรบอทสยาม อุปกรณ์หุ่นยนต์ Arduino
สมัครสมาชิกร้านนี้ เพื่อรับสิทธิพิเศษ


▲
▼
รายการสั่งซื้อของฉัน
รายการสั่งซื้อของฉัน
ข้อมูลร้านค้านี้

โรบอทสยาม อุปกรณ์หุ่นยนต์ Arduino
จําหน่าย อุปกรณ์หุ่นยนต์ Arduino , ESP8266, ESP32 , STM32 , micro:bit , Paspberry Pi รับประกอบหุ่นยนต์ ชุดคิทหุ่นยนต์ ตัวอย่างโปรเจค IoT (Internet of Things) อินเทอร์เน็ตของสรรพสิ่ง
เบอร์โทร : 095-226-2116
อีเมล : robotsiam16@gmail.com
อีเมล : robotsiam16@gmail.com
ส่งข้อความติดต่อร้าน
เกี่ยวกับร้านค้านี้
ค้นหาสินค้าในร้านนี้
ค้นหาสินค้า
สินค้าที่ดูล่าสุด
บันทึกเป็นร้านโปรด
Join เป็นสมาชิกร้าน
แชร์หน้านี้
แชร์หน้านี้
↑
TOP เลื่อนขึ้นบนสุด
TOP เลื่อนขึ้นบนสุด
สินค้าในตะกร้า ({{total_num}} รายการ)

ขออภัย ขณะนี้ยังไม่มีสินค้าในตะกร้า
ราคาสินค้าทั้งหมด
฿ {{price_format(total_price)}}
- ฿ {{price_format(discount.price)}}
ราคาสินค้าทั้งหมด
{{total_quantity}} ชิ้น
฿ {{price_format(after_product_price)}}
ราคาไม่รวมค่าจัดส่ง
➜ เลือกซื้อสินค้าเพิ่ม