
โปรเจค Arduino เปิดปิดไฟ ด้วย Wireless Joystick (จอยไร้สาย)
6 ปีที่ผ่านมา
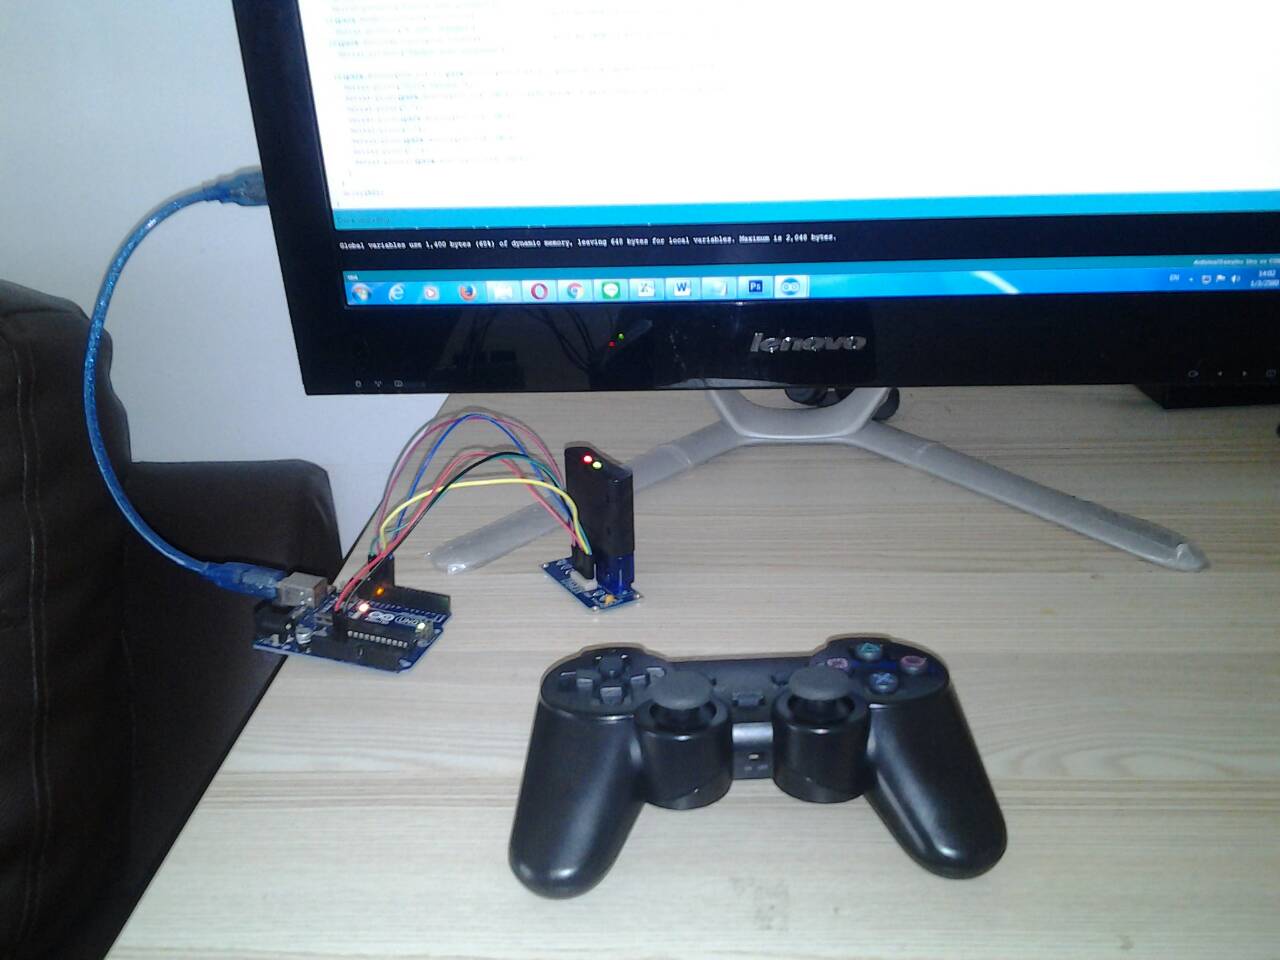
PS2 Joystick Playstation Adapter for Arduino อะแดปเตอร์แปลงหัว PS2 เป็นขาต่อแบบ DIP สำหรับ Arduino คอนเนคเตอร์สำหรับแปลงจาก PS2 เป็นขา DIP สำหรับต่อสายเข้ากับไมโครคอนโทรลเลอร์ สำหรับใช้ในการควบคุมหุ่นยนต์
อุปกรณ์ที่ต้องใช้ก็คือ
1. Arduino UNO R3 - Made in italy
2. Wireless Joystick Playstation PS2 Controlle (จอยไร้สาย)
3. PS2 Joystick Converter Adapter for Arduino (อะแดปเตอร์แปลงหัว)
4. Jumper (F2M) cable wire 40pcs 2.54mm 20cm Female to Male
5. Relay 4 Channel 5V DC Solid State High Level Trigger
6. Jumper (M2M) cable wire 40pcs 2.54mm 20cm Male to Male
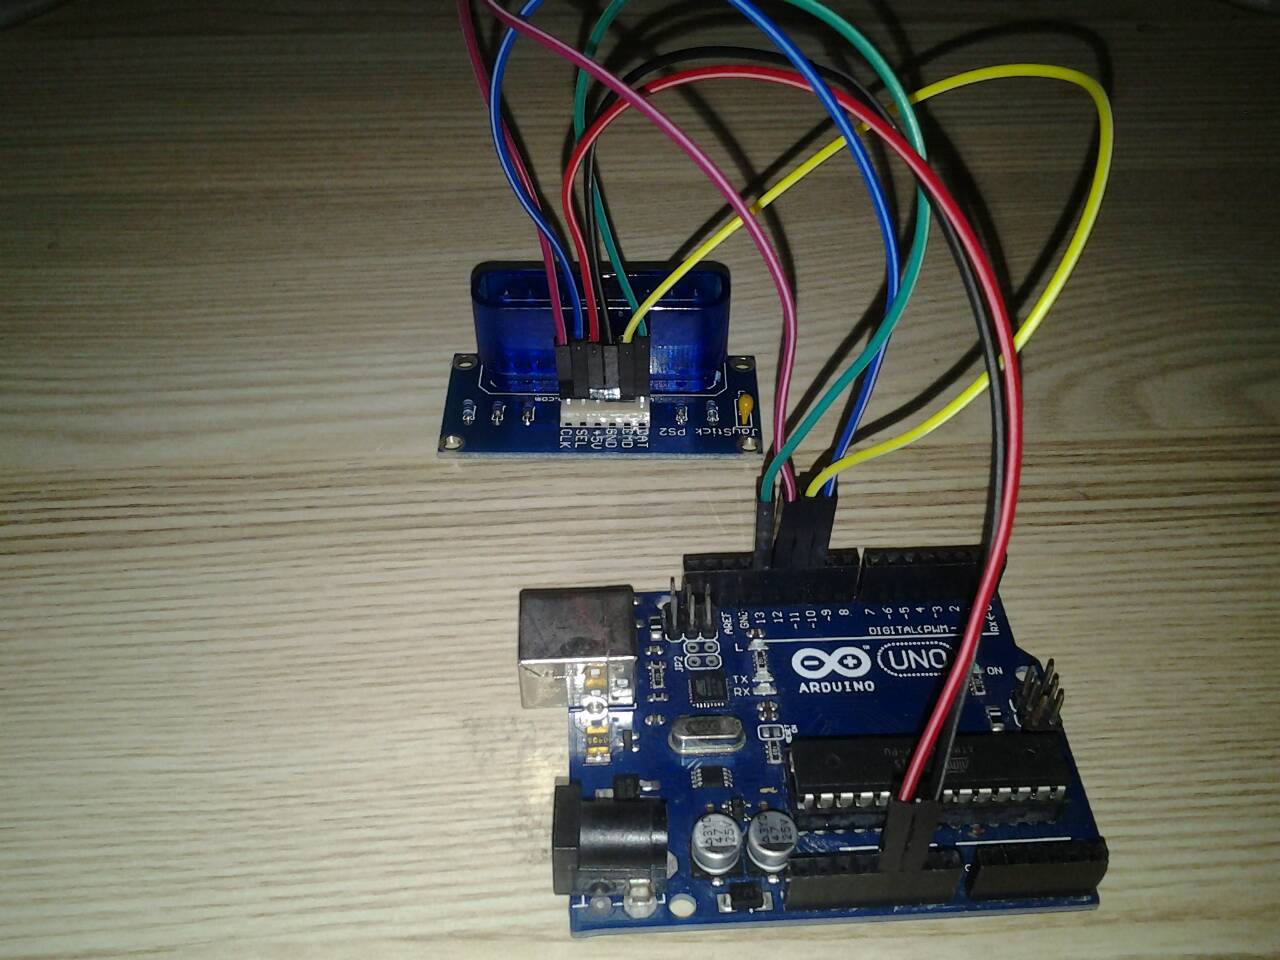
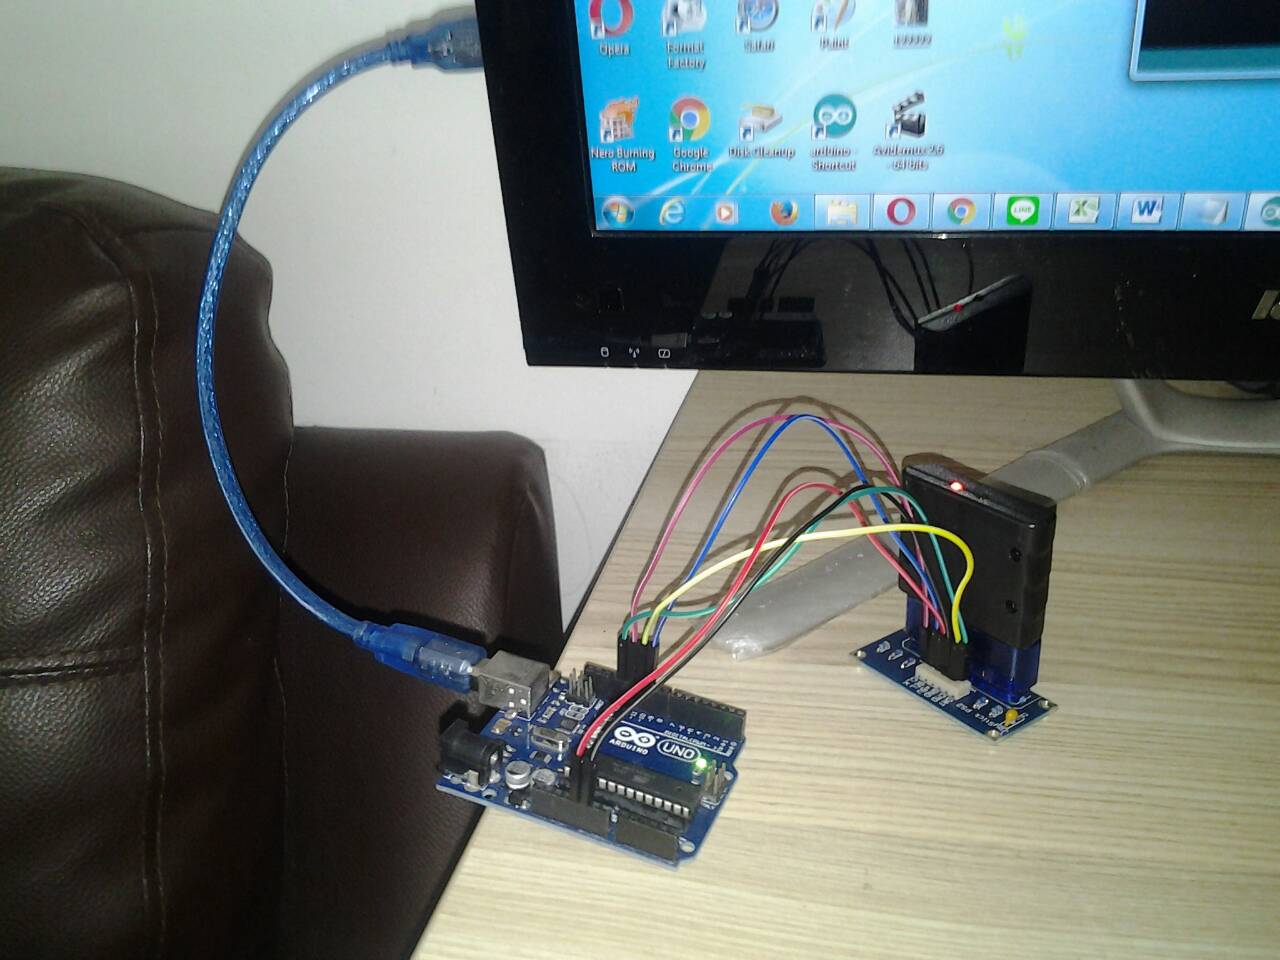
1. เชื่อมต่อบอร์ด Arduino กับ PS2 Adapter
- PS2 Adapter Arduino Board
- DAT D 13
- CMD D 11
- GND GND
- +5V +5V
- SEL D 10
- CLK D 12

สายสีดำ GND <-> GND
สายสีแดง +5V <-> +5V

สายสีเขียว DAT <-> D 13
สายสีเหลือง CMD <-> D 11
สายสีน้ำเงิน SEL <-> D 10
สายสีม่วง CLK <-> D 12
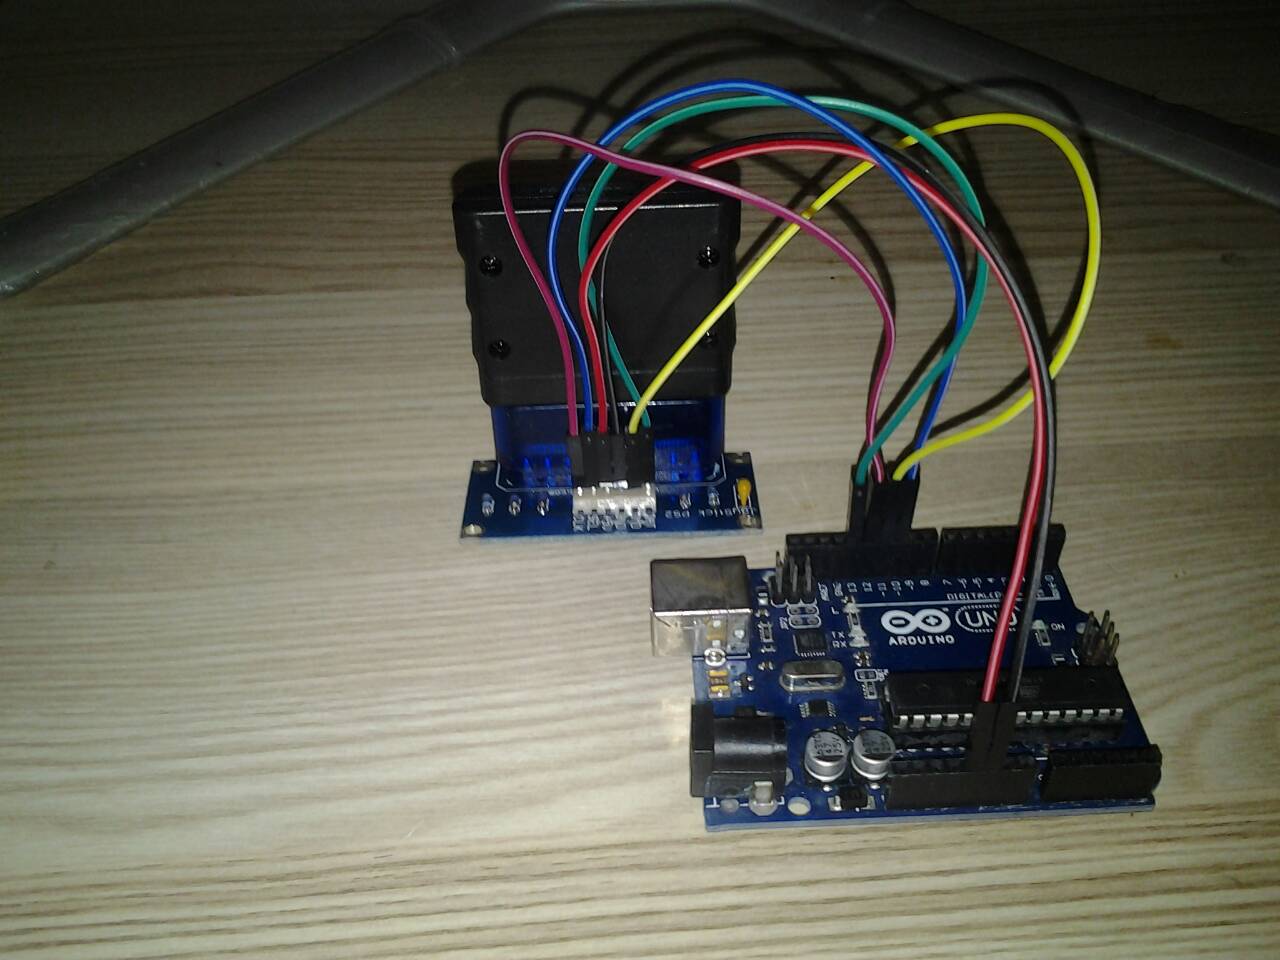
Receiver ของ Wireless Joystick Playstation PS2

ประกอบ Receiver เข้า กับ อะแดปเตอร์แปลงหัว
2. ติดตั้ง Arduino (IDE) เวอร์ชั่น 1.6.5
เนื่องจาก ไลบรารี่ PS2X สำหรับ Wireless Joystick (จอยสติ๊กไร้สาย) ในตัวอย่างบทความ เป็นไลบรารี่ ที่ออกแบบสำหรับ Arduino (IDE) เวอร์ชั่น 1.6
ดังจึงแนะนำให้เลือกใช้ Arduino (IDE) เวอร์ชั่น 1.6.5 ซึ่งเป็นเวอร์ชั่นเก่า
2.1 ติดตั้ง Arduino (IDE) เวอร์ชั่น 1.6.5 ตามตัวอย่างในบทความ ให้เลือก วิธีที่ 2
คือ 2.ลงแบบไฟล์บีบอัด (Unzip)
https://robotsiam.blogspot.com/2016/08/arduino-ide.html
2.2 ทดสอบ โปรแกรมแรก Hello World กับ Arduino UNO R3
https://robotsiam.blogspot.com/2016/08/hello-world-arduino-uno-r3.html
3. ติดตั้ง ไลบรารี่ PS2X
ไลบรารี่ PS2X เป็น ไลบรารี่ ฟังก์ชัน ที่มีผู้พัฒนาเตรียมพร้อมไว้ให้เราแล้ว
โดยให้ไปดาวน์โหลด ไลบรารี่ PS2X ได้ที่
Download library
หรือ
3.1 Unzip ไฟล์ที่ดาวน์โหลดมา PS2X_lib และติดตั้ง ไลบรารี่ PS2X ลงในโปรแกรม Arduino (IDE) เวอร์ชั่น 1.6.5
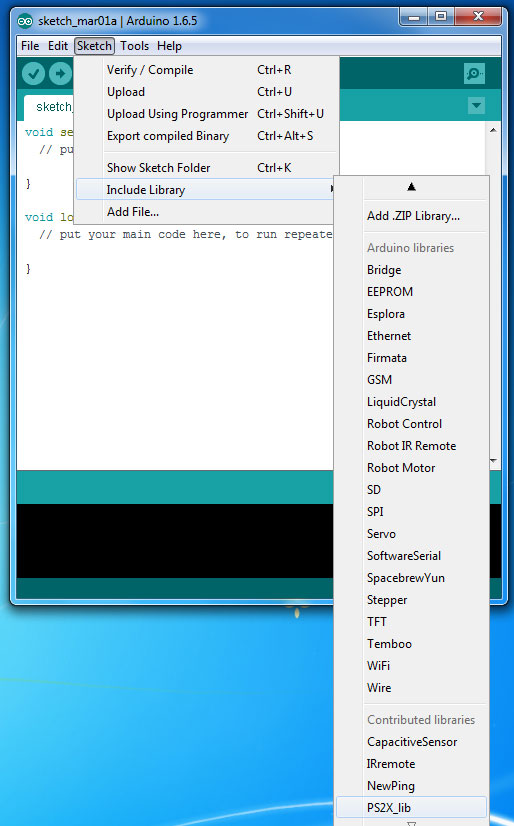
3.2 ตรวจสอบว่า ไลบรารี่ PS2X ติดตั้งแล้วหรือยังโดยไปที่ Sketch -> Include Library ต้องพบ PS2X_lib
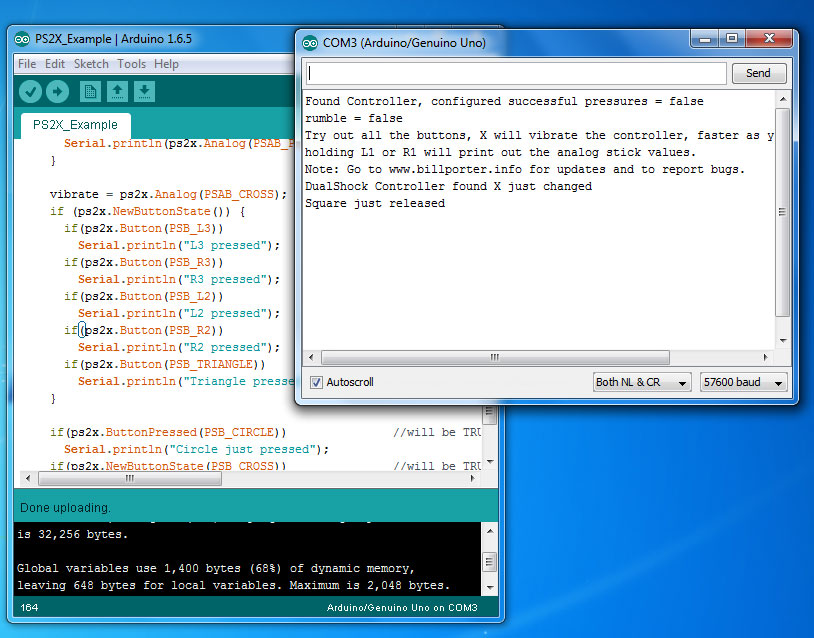
4. อัพโหลดโค้ด
#include <PS2X_lib.h> //for v1.6
/******************************************************************
set pins connected to PS2 controller:
- 1e column: original
- 2e colmun: Stef?
replace pin numbers by the ones you use
******************************************************************/
#define PS2_DAT 13
#define PS2_CMD 11
#define PS2_SEL 10
#define PS2_CLK 12
int CH1 = 9;
int CH2 = 8;
int CH3 = 7;
int CH4 = 6;
/******************************************************************
select modes of PS2 controller:
- pressures = analog reading of push-butttons
- rumble = motor rumbling
uncomment 1 of the lines for each mode selection
******************************************************************/
//#define pressures true
#define pressures false
//#define rumble true
#define rumble false
PS2X ps2x; // create PS2 Controller Class
//right now, the library does NOT support hot pluggable controllers, meaning
//you must always either restart your Arduino after you connect the controller,
//or call config_gamepad(pins) again after connecting the controller.
int error = 0;
byte type = 0;
byte vibrate = 0;
void setup() {
pinMode(CH1, OUTPUT);
pinMode(CH2, OUTPUT);
pinMode(CH3, OUTPUT);
pinMode(CH4, OUTPUT);
Serial.begin(57600);
delay(300); //added delay to give wireless ps2 module some time to startup, before configuring it
//CHANGES for v1.6 HERE!!! **************PAY ATTENTION*************
//setup pins and settings: GamePad(clock, command, attention, data, Pressures?, Rumble?) check for error
error = ps2x.config_gamepad(PS2_CLK, PS2_CMD, PS2_SEL, PS2_DAT, pressures, rumble);
if (error == 0) {
Serial.print("Found Controller, configured successful ");
Serial.print("pressures = ");
if (pressures)
Serial.println("true ");
else
Serial.println("false");
Serial.print("rumble = ");
if (rumble)
Serial.println("true)");
else
Serial.println("false");
Serial.println("Try out all the buttons, X will vibrate the controller, faster as you press harder;");
Serial.println("holding L1 or R1 will print out the analog stick values.");
Serial.println("Note: Go to www.billporter.info for updates and to report bugs.");
}
else if (error == 1)
Serial.println("No controller found, check wiring, see readme.txt to enable debug. visit www.billporter.info for troubleshooting tips");
else if (error == 2)
Serial.println("Controller found but not accepting commands. see readme.txt to enable debug. Visit www.billporter.info for troubleshooting tips");
else if (error == 3)
Serial.println("Controller refusing to enter Pressures mode, may not support it. ");
// Serial.print(ps2x.Analog(1), HEX);
type = ps2x.readType();
switch (type) {
case 0:
Serial.print("Unknown Controller type found ");
break;
case 1:
Serial.print("DualShock Controller found ");
break;
case 2:
Serial.print("GuitarHero Controller found ");
break;
case 3:
Serial.print("Wireless Sony DualShock Controller found ");
break;
}
}
void loop() {
/* You must Read Gamepad to get new values and set vibration values
ps2x.read_gamepad(small motor on/off, larger motor strenght from 0-255)
if you don't enable the rumble, use ps2x.read_gamepad(); with no values
You should call this at least once a second
*/
if (error == 1) //skip loop if no controller found
return;
if (type == 2) { //Guitar Hero Controller
ps2x.read_gamepad(); //read controller
if (ps2x.ButtonPressed(GREEN_FRET))
Serial.println("Green Fret Pressed");
if (ps2x.ButtonPressed(RED_FRET))
Serial.println("Red Fret Pressed");
if (ps2x.ButtonPressed(YELLOW_FRET))
Serial.println("Yellow Fret Pressed");
if (ps2x.ButtonPressed(BLUE_FRET))
Serial.println("Blue Fret Pressed");
if (ps2x.ButtonPressed(ORANGE_FRET))
Serial.println("Orange Fret Pressed");
if (ps2x.ButtonPressed(STAR_POWER))
Serial.println("Star Power Command");
if (ps2x.Button(UP_STRUM)) //will be TRUE as long as button is pressed
Serial.println("Up Strum");
if (ps2x.Button(DOWN_STRUM))
Serial.println("DOWN Strum");
if (ps2x.Button(PSB_START)) //will be TRUE as long as button is pressed
Serial.println("Start is being held");
if (ps2x.Button(PSB_SELECT))
Serial.println("Select is being held");
if (ps2x.Button(ORANGE_FRET)) { // print stick value IF TRUE
Serial.print("Wammy Bar Position:");
Serial.println(ps2x.Analog(WHAMMY_BAR), DEC);
}
}
else { //DualShock Controller
ps2x.read_gamepad(false, vibrate); //read controller and set large motor to spin at 'vibrate' speed
if (ps2x.Button(PSB_START)) { //will be TRUE as long as button is pressed
Serial.println("Start is being held");
digitalWrite(CH1, LOW);
digitalWrite(CH2, LOW);
digitalWrite(CH3, LOW);
digitalWrite(CH4, LOW);
}
if (ps2x.Button(PSB_SELECT)) {
Serial.println("Select is being held");
digitalWrite(CH1, HIGH);
digitalWrite(CH2, HIGH);
digitalWrite(CH3, HIGH);
digitalWrite(CH4, HIGH);
}
if (ps2x.Button(PSB_PAD_UP)) { //will be TRUE as long as button is pressed
Serial.print("Up held this hard: ");
Serial.println(ps2x.Analog(PSAB_PAD_UP), DEC);
digitalWrite(CH2, HIGH);
}
if (ps2x.Button(PSB_PAD_RIGHT)) {
Serial.print("Right held this hard: ");
Serial.println(ps2x.Analog(PSAB_PAD_RIGHT), DEC);
digitalWrite(CH3, HIGH);
}
if (ps2x.Button(PSB_PAD_LEFT)) {
Serial.print("LEFT held this hard: ");
Serial.println(ps2x.Analog(PSAB_PAD_LEFT), DEC);
digitalWrite(CH1, HIGH);
}
if (ps2x.Button(PSB_PAD_DOWN)) {
Serial.print("DOWN held this hard: ");
Serial.println(ps2x.Analog(PSAB_PAD_DOWN), DEC);
digitalWrite(CH4, HIGH);
}
vibrate = ps2x.Analog(PSAB_CROSS); //this will set the large motor vibrate speed based on how hard you press the blue (X) button
if (ps2x.NewButtonState()) { //will be TRUE if any button changes state (on to off, or off to on)
if (ps2x.Button(PSB_L3))
Serial.println("L3 pressed");
if (ps2x.Button(PSB_R3))
Serial.println("R3 pressed");
if (ps2x.Button(PSB_L2))
Serial.println("L2 pressed");
if (ps2x.Button(PSB_R2))
Serial.println("R2 pressed");
if (ps2x.Button(PSB_TRIANGLE))
Serial.println("Triangle pressed");
}
if (ps2x.ButtonPressed(PSB_CIRCLE)) //will be TRUE if button was JUST pressed
Serial.println("Circle just pressed");
if (ps2x.NewButtonState(PSB_CROSS)) //will be TRUE if button was JUST pressed OR released
Serial.println("X just changed");
if (ps2x.ButtonReleased(PSB_SQUARE)) //will be TRUE if button was JUST released
Serial.println("Square just released");
if (ps2x.Button(PSB_L1) || ps2x.Button(PSB_R1)) { //print stick values if either is TRUE
Serial.print("Stick Values:");
Serial.print(ps2x.Analog(PSS_LY), DEC); //Left stick, Y axis. Other options: LX, RY, RX
Serial.print(",");
Serial.print(ps2x.Analog(PSS_LX), DEC);
Serial.print(",");
Serial.print(ps2x.Analog(PSS_RY), DEC);
Serial.print(",");
Serial.println(ps2x.Analog(PSS_RX), DEC);
}
}
delay(50);
}
5. ทดสอบการทำงาน
5.1 หลังจากนั้นสังเกตที่ Receiver ที่ไฟแสดงผล LED ไฟสีแดงจะติด และ ไฟสีเขียวกระพริบ แสดงว่าพร้อมใช้งาน
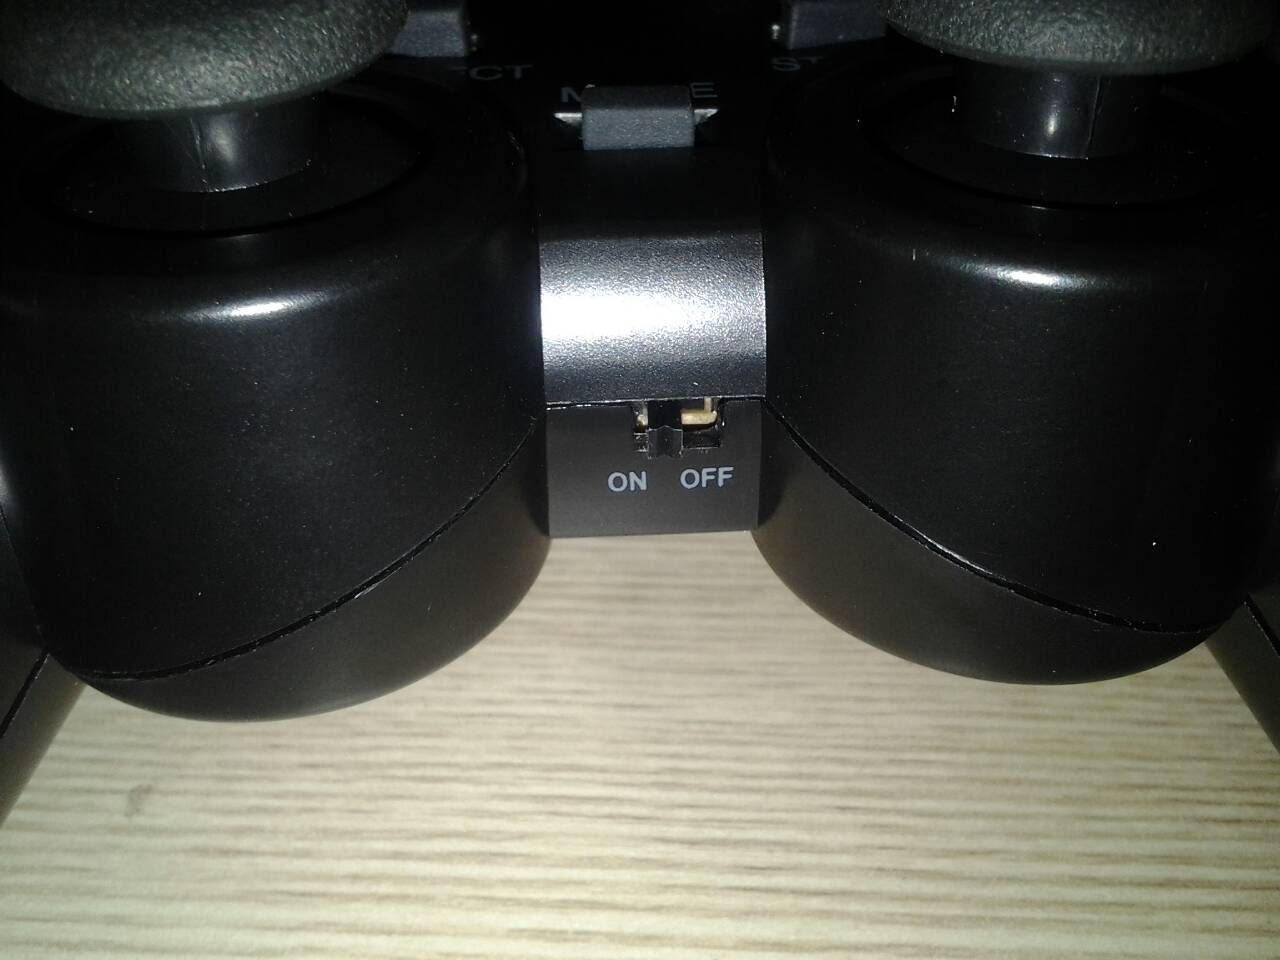
5.2 ใส่ถ่าน ขนาด AAA จำนวน 2 ก้อน ที่ Wireless Joystick Playstation PS2

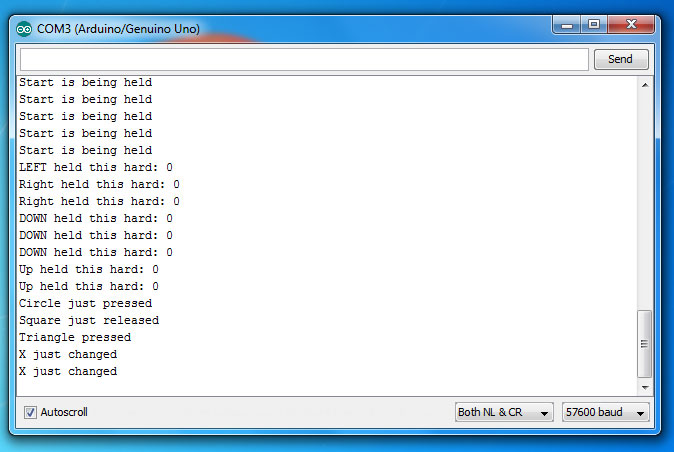
5.4 เปิดหน้าต่าง Serial Monitor มุมขวาล่าง ของ Serial Monitor เลือก 57600 baud คือ ตั้งค่าความเร็วในการรับ-ส่งข้อมูล คือ 57600
5.5 กดคีย์สวิตซ์ต่างๆที่ Wireless Joystick จะแสดงค่าคีย์ที่ถูกกด แสดงว่า Wireless Joystick Playstation PS2 ของเราเชื่อมต่อ และ พร้อมใช้งานแล้ว

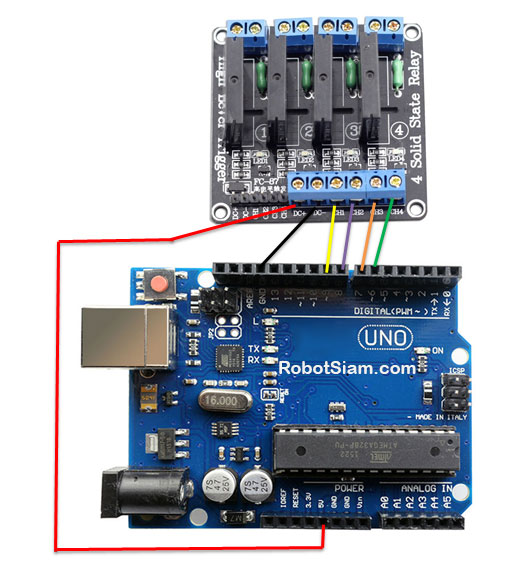
6. เชื่อมต่อ Arduino กับ Relay 4 Channel

ต่อบอร์ด Arduino กับ Relay ดังนี้
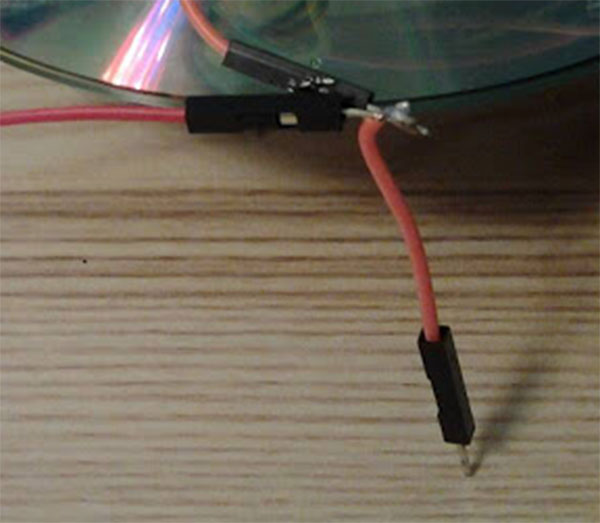
หมายเหตุ : Relay ใช้ไฟ 5V จุดเดียวกับ PS2 Adapter จำเป็น ต้อง บัดกรีหรือเชื่อมต่อทั้ง 2 สาย ร่วมกันก่อน แล้วจึงต่อลงไปที่ 5V ของ Arduino อีกครั้ง
7. ทดสอบการทำงาน
กด LEFT : CH1 ทำงาน (ไฟ LED สีแดงติด)
กด UP : CH2 ทำงาน (ไฟ LED สีแดงติด)
กด RIGHT : CH3 ทำงาน (ไฟ LED สีแดงติด)
กด DOWN : CH4 ทำงาน (ไฟ LED สีแดงติด)
กด START : CH1 - 4 ปิดทั้งหมด (ไฟ LED สีแดงดับ)
กด SELECT : CH1 - 4 เปิดทั้งหมด (ไฟ LED สีแดงติด)
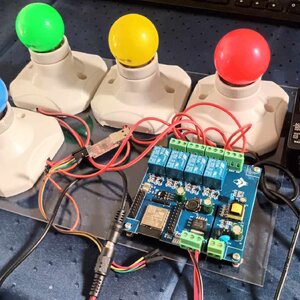
8. เชื่อมต่อ Relay 4 Channel กับ หลอดไฟ

ต่อบอร์ด Arduino กับ Relay ดังนี้
- Relay 4 Channel Arduino Board
- DC+ 5V
- DC- GND
- CH1 D 9
- CH2 D 8
- CH3 D 7
- CH4 D 6
หมายเหตุ : Relay ใช้ไฟ 5V จุดเดียวกับ PS2 Adapter จำเป็น ต้อง บัดกรีหรือเชื่อมต่อทั้ง 2 สาย ร่วมกันก่อน แล้วจึงต่อลงไปที่ 5V ของ Arduino อีกครั้ง
7. ทดสอบการทำงาน
กด LEFT : CH1 ทำงาน (ไฟ LED สีแดงติด)
กด UP : CH2 ทำงาน (ไฟ LED สีแดงติด)
กด RIGHT : CH3 ทำงาน (ไฟ LED สีแดงติด)
กด DOWN : CH4 ทำงาน (ไฟ LED สีแดงติด)
กด START : CH1 - 4 ปิดทั้งหมด (ไฟ LED สีแดงดับ)
กด SELECT : CH1 - 4 เปิดทั้งหมด (ไฟ LED สีแดงติด)
8. เชื่อมต่อ Relay 4 Channel กับ หลอดไฟ


BLOG

โปรเจค Arduino 3 in 1 หรี่ไฟบ้าน 220V ด้วยแอปมือถือ / ด้วยขวดโค๊ก / ด้วยท่าทางมือ
1 ปีที่ผ่านมา
ชุดคิท Arduino 3 in 1 หรี่ไฟบ้าน 220V ด้วย แอปมือถือ / ขวดโค๊ก / ท่าทางมือ (Gestures) การเรียนรู้การสร้างระบบหรี่ไฟบ้าน 220V โดยใช้ Arduino มีข้อดีหลายประการ ดังนี้: พัฒนาทักษะด้านอิเล็กทรอนิกส์: การสร้างระบบนี้ช่วยให้คุณได้ฝึกทักษะการทำงานกับวงจรไฟฟ…
1 ปีที่ผ่านมา
ชุดคิท Arduino 3 in 1 หรี่ไฟบ้าน 220V ด้วย แอปมือถือ / ขวดโค๊ก / ท่าทางมือ (Gestures) การเรียนรู้การสร้างระบบหรี่ไฟบ้าน 220V โดยใช้ Arduino มีข้อดีหลายประการ ดังนี้: พัฒนาทักษะด้านอิเล็กทรอนิกส์: การสร้างระบบนี้ช่วยให้คุณได้ฝึกทักษะการทำงานกับวงจรไฟฟ…
โปรเจค ESP32 เปิด-ปิดไฟบ้าน 220V ผ่านอินเตอร์เน็ต ได้ทั่วโลก ด้วย Blynk 2.0
1 ปีที่ผ่านมา
ชุดคิท IoT ESP32 2 in 1 เปิดปิดไฟ ผ่าน อินเตอร์เน็ต ด้วย BLYNK / ESP Rainmaker Blynk คือ แพลตฟอร์ม IoT ที่ช่วยให้ผู้ใช้สามารถควบคุมและติดตามอุปกรณ์ผ่านอินเทอร์เน็ตได้ง่าย ๆ โดยไม่ต้องเขียนโค้ดซับซ้อน มีแอปพลิเคชันบนสมาร์ทโฟนที่สามารถออกแบบ UI เพื่อคว…
1 ปีที่ผ่านมา
ชุดคิท IoT ESP32 2 in 1 เปิดปิดไฟ ผ่าน อินเตอร์เน็ต ด้วย BLYNK / ESP Rainmaker Blynk คือ แพลตฟอร์ม IoT ที่ช่วยให้ผู้ใช้สามารถควบคุมและติดตามอุปกรณ์ผ่านอินเทอร์เน็ตได้ง่าย ๆ โดยไม่ต้องเขียนโค้ดซับซ้อน มีแอปพลิเคชันบนสมาร์ทโฟนที่สามารถออกแบบ UI เพื่อคว…

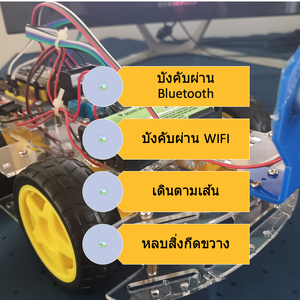
โปรเจค หุ่นยนต์ Arduino 4in1 - บังคับด้วยแอพ / ควบคุมด้วยเสียงปรบมือ / เดินตามเส้น / หลบสิ่งกีดขวาง
1 ปีที่ผ่านมา
ชุดคิท หุ่นยนต์ Arduino 4in1 - บังคับด้วยแอพ / ควบคุมด้วยเสียงปรบมือ / เดินตามเส้น / หลบสิ่งกีดขวาง แบบ DIY (มี ขั้นตอนวิธีทำ และ โค้ด)ชุดคิท หุ่นยนต์ Arduino 4in1 ชุดนี้ สามารถ ทดสอบ ทำโปรเจค ได้หลากหลายรูปแบบ เหมาะสำหรับ โรงเรียน สถานศึกษา ใช้ในการ…
1 ปีที่ผ่านมา
ชุดคิท หุ่นยนต์ Arduino 4in1 - บังคับด้วยแอพ / ควบคุมด้วยเสียงปรบมือ / เดินตามเส้น / หลบสิ่งกีดขวาง แบบ DIY (มี ขั้นตอนวิธีทำ และ โค้ด)ชุดคิท หุ่นยนต์ Arduino 4in1 ชุดนี้ สามารถ ทดสอบ ทำโปรเจค ได้หลากหลายรูปแบบ เหมาะสำหรับ โรงเรียน สถานศึกษา ใช้ในการ…
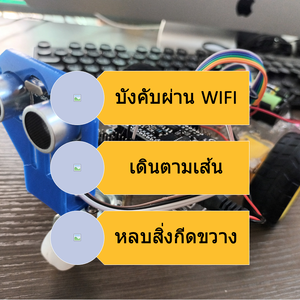
โปรเจค หุ่นยนต์ ESP8266 3in1 - บังคับผ่าน WIFI / เดินตามเส้น / หลบสิ่งกีดขวาง
1 ปีที่ผ่านมา
ชุดคิท หุ่นยนต์ ESP8266 3in1 - บังคับผ่าน WIFI / เดินตามเส้น / หลบสิ่งกีดขวาง แบบ DIY (มี ขั้นตอนวิธีทำ และ โค้ด)ชุดคิท หุ่นยนต์ ESP8266 V3 3in1 ชุดนี้ สามารถ ทดสอบ ทำโปรเจค ได้หลากหลายรูปแบบ เหมาะสำหรับ โรงเรียน สถานศึกษา ใช้ในการเรียนรู้การสร้างหุ่…
1 ปีที่ผ่านมา
ชุดคิท หุ่นยนต์ ESP8266 3in1 - บังคับผ่าน WIFI / เดินตามเส้น / หลบสิ่งกีดขวาง แบบ DIY (มี ขั้นตอนวิธีทำ และ โค้ด)ชุดคิท หุ่นยนต์ ESP8266 V3 3in1 ชุดนี้ สามารถ ทดสอบ ทำโปรเจค ได้หลากหลายรูปแบบ เหมาะสำหรับ โรงเรียน สถานศึกษา ใช้ในการเรียนรู้การสร้างหุ่…
โปรเจค หุ่นยนต์ ESP32 5 in 1 - บังคับผ่าน Bluetooth / บังคับผ่าน WIFI / บังคับผ่านอินเตอร์เน็ต / เดินตามเส้น / หลบสิ่งกีดขวาง
1 ปีที่ผ่านมา
ชุดคิท หุ่นยนต์ ESP32 5 in 1 - บังคับผ่าน Bluetooth / บังคับผ่าน WIFI / บังคับ ผ่านอินเตอร์เน็ต/ เดินตามเส้น / หลบสิ่งกีดขวาง แบบ DIY (มี ขั้นตอนวิธีทำ และ โค้ด)ชุดคิท หุ่นยนต์ ESP32 4in1 ชุดนี้ สามารถ ทดสอบ ทำโปรเจค ได้หลากหลายรูปแบบ เหมาะสำหรับ โรง…
1 ปีที่ผ่านมา
ชุดคิท หุ่นยนต์ ESP32 5 in 1 - บังคับผ่าน Bluetooth / บังคับผ่าน WIFI / บังคับ ผ่านอินเตอร์เน็ต/ เดินตามเส้น / หลบสิ่งกีดขวาง แบบ DIY (มี ขั้นตอนวิธีทำ และ โค้ด)ชุดคิท หุ่นยนต์ ESP32 4in1 ชุดนี้ สามารถ ทดสอบ ทำโปรเจค ได้หลากหลายรูปแบบ เหมาะสำหรับ โรง…
โปรเจค ESP32 เปิด-ปิดไฟ ผ่านอินเตอร์เน็ตด้วย ESP Rainmaker
2 ปีที่ผ่านมา
ESP RainMaker เป็นแพลตฟอร์มที่ช่วยให้นักพัฒนาสร้างอุปกรณ์ที่เชื่อมต่อกับ ESP32-S2 SoC ของ Espressif โดยไม่ต้องวุ่นวายกับการจัดการโครงสร้างพื้นฐาน มี SDK ของอุปกรณ์ แอปโทรศัพท์ที่ปรับเปลี่ยนได้เอง มิดเดิลแวร์คลาวด์แบบโปร่งใส และยูทิลิตีโฮสต์เพื่อลดควา…
2 ปีที่ผ่านมา
ESP RainMaker เป็นแพลตฟอร์มที่ช่วยให้นักพัฒนาสร้างอุปกรณ์ที่เชื่อมต่อกับ ESP32-S2 SoC ของ Espressif โดยไม่ต้องวุ่นวายกับการจัดการโครงสร้างพื้นฐาน มี SDK ของอุปกรณ์ แอปโทรศัพท์ที่ปรับเปลี่ยนได้เอง มิดเดิลแวร์คลาวด์แบบโปร่งใส และยูทิลิตีโฮสต์เพื่อลดควา…

โปรเจค Arduino เปิด-ปิดไฟ ด้วย โทรศัพท์ ผ่าน แอพบลูทูธ
2 ปีที่ผ่านมา
โปรเจค Arduino: เปิด-ปิดไฟด้วย โทรศัพท์ ผ่าน แอพบลูทูธ การควบคุมการเปิด-ปิดไฟในบ้านหรือสถานที่ต่าง ๆ ได้ง่ายขึ้นด้วยการใช้ Arduino ร่วมกับบลูทูธ. ในบทความนี้, เราจะสร้างโปรเจคที่ใช้ Arduino เพื่อควบคุมไฟผ่านแอพบลูทูธบนโทรศัพท์มือถือของเรา. การทำโปรเจ…
2 ปีที่ผ่านมา
โปรเจค Arduino: เปิด-ปิดไฟด้วย โทรศัพท์ ผ่าน แอพบลูทูธ การควบคุมการเปิด-ปิดไฟในบ้านหรือสถานที่ต่าง ๆ ได้ง่ายขึ้นด้วยการใช้ Arduino ร่วมกับบลูทูธ. ในบทความนี้, เราจะสร้างโปรเจคที่ใช้ Arduino เพื่อควบคุมไฟผ่านแอพบลูทูธบนโทรศัพท์มือถือของเรา. การทำโปรเจ…
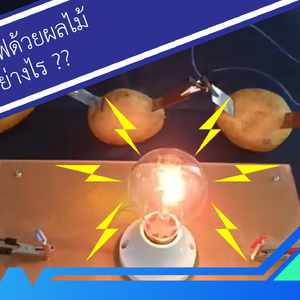
โปรเจค Arduino ไฟฟ้าจากผลไม้ กับ หลอดไฟ 220 โวลต์
2 ปีที่ผ่านมา
สอนทำโปรเจค Arduino ไฟฟ้าจากผลไม้ กับ หลอดไฟ 220 โวลต์ "ทดลองไฟฟ้าจากผลไม้" เป็นการทดลองทางวิทยาศาสตร์ที่น่าสนใจเพื่อศึกษาและทดสอบกระบวนการผลิตไฟฟ้าโดยใช้มันฝรั่งในฐานะวัตถุดิบหลัก. การทดลองนี้มุ่งเน้นการเรียนรู้และทำความเข้าใจถึงพลังงานที่เกิดขึ้นจา…
2 ปีที่ผ่านมา
สอนทำโปรเจค Arduino ไฟฟ้าจากผลไม้ กับ หลอดไฟ 220 โวลต์ "ทดลองไฟฟ้าจากผลไม้" เป็นการทดลองทางวิทยาศาสตร์ที่น่าสนใจเพื่อศึกษาและทดสอบกระบวนการผลิตไฟฟ้าโดยใช้มันฝรั่งในฐานะวัตถุดิบหลัก. การทดลองนี้มุ่งเน้นการเรียนรู้และทำความเข้าใจถึงพลังงานที่เกิดขึ้นจา…
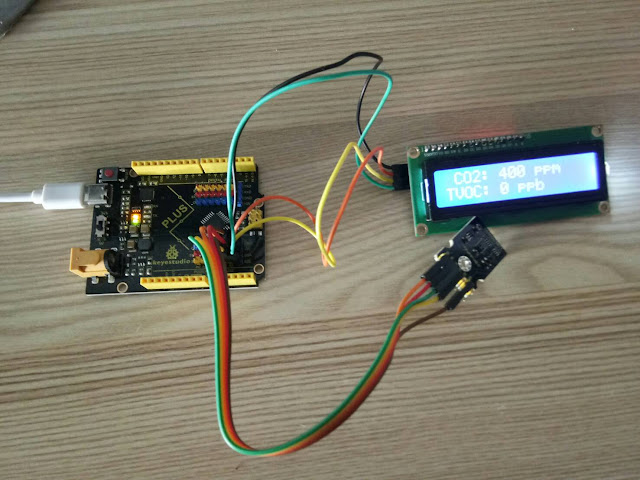
มินิโปรเจค Arduino วัดก๊าซคาร์บอนไดออกไซด์ แสดงผลที่จอ LCD
4 ปีที่ผ่านมา
ระดับคาร์บอนไดออกไซด์ปกติ (Normal CO2 Levels) ระดับคาร์บอนไดออกไซด์ปกติผลกระทบของ CO2 ต่อผู้ใหญ่ที่มีสุขภาพที่ดีสามารถสรุปได้ดังนี้-ระดับกลางแจ้งปกติ: 350 – 450 ppm-ระดับที่ยอมรับได้: <600 ppm=”” span=””>-ข้อร้องเร…
4 ปีที่ผ่านมา
ระดับคาร์บอนไดออกไซด์ปกติ (Normal CO2 Levels) ระดับคาร์บอนไดออกไซด์ปกติผลกระทบของ CO2 ต่อผู้ใหญ่ที่มีสุขภาพที่ดีสามารถสรุปได้ดังนี้-ระดับกลางแจ้งปกติ: 350 – 450 ppm-ระดับที่ยอมรับได้: <600 ppm=”” span=””>-ข้อร้องเร…
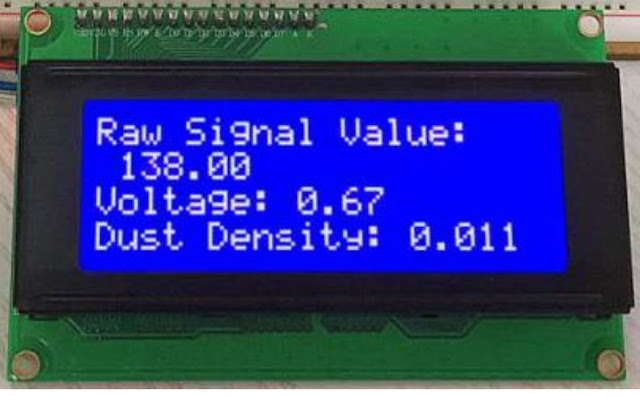
มินิโปรเจค Arduino เครื่องวัดฝุ่น PM2.5 ด้วย เซ็นเซอร์ GP2Y1014AU
4 ปีที่ผ่านมา
เครื่องวัดฝุ่น PM2.5 ด้วย เซ็นเซอร์ GP2Y1014AU บทความนี้ กล่าวถึงขั้นตอนการทำงานโปรเจค เครื่องวัดฝุ่น PM2.5 กับ Arduino UNO โดยใช้ เซ็นเซอร์วัดฝุ่น PM2.5 Keyestudio GP2Y1014AU ของ Sharp เซ็นเซอร์ฝุ่นนี้มีขนาดเล็กและสามารถตรวจจับฝุ่นละอองและอนุภาคควัน…
4 ปีที่ผ่านมา
เครื่องวัดฝุ่น PM2.5 ด้วย เซ็นเซอร์ GP2Y1014AU บทความนี้ กล่าวถึงขั้นตอนการทำงานโปรเจค เครื่องวัดฝุ่น PM2.5 กับ Arduino UNO โดยใช้ เซ็นเซอร์วัดฝุ่น PM2.5 Keyestudio GP2Y1014AU ของ Sharp เซ็นเซอร์ฝุ่นนี้มีขนาดเล็กและสามารถตรวจจับฝุ่นละอองและอนุภาคควัน…
มินิโปรเจค Arduino หรี่ไฟ AC 220V ผ่านบลูทูธ ด้วย App Android
5 ปีที่ผ่านมา
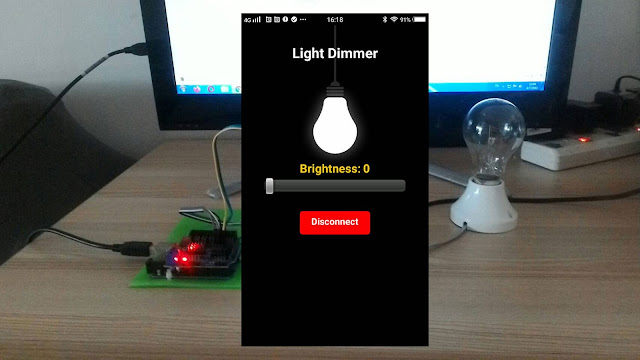
หรี่ไฟ AC 220V ผ่านบลูทูธ ด้วย App Android เป้าหมายและหลักการทำงานของโปรเจค ต้องการหรี่ไฟ หรือควบคุมแสงสว่างของหลอดไฟหรืออุปกรณ์ไฟฟ้าอื่นๆ แบบไร้สายผ่านโทรศัพท์มือถือด้วยแอพแอนดรอยด์ (App Android) เพื่อเป็นการประหยัดพลังงาน และความสะดวกในการควบคุม ซึ…
5 ปีที่ผ่านมา
หรี่ไฟ AC 220V ผ่านบลูทูธ ด้วย App Android เป้าหมายและหลักการทำงานของโปรเจค ต้องการหรี่ไฟ หรือควบคุมแสงสว่างของหลอดไฟหรืออุปกรณ์ไฟฟ้าอื่นๆ แบบไร้สายผ่านโทรศัพท์มือถือด้วยแอพแอนดรอยด์ (App Android) เพื่อเป็นการประหยัดพลังงาน และความสะดวกในการควบคุม ซึ…

มินิโปรเจค สร้างเกม Endless Runner ด้วย Arduino และ จอ LCD
5 ปีที่ผ่านมา
มินิโปรเจค สร้างเกม Endless Runner ด้วย Arduino และ จอ LCD การสร้างเกม ก็คือการเขียนโปรแกรมแบบหนึ่ง ให้แสดงผลถี่ๆ แล้วเขียนโปรแกรมให้การแสดงผลในแต่ละครั้ง ค่อยๆทำให้ตัวละครในภาพค่อยๆขยับ โดยการทำการเปลี่ยนภาพ หรือเคลื่อนที่ตัวละคร ก็จะเกิดการเคลื่อนไ…
5 ปีที่ผ่านมา
มินิโปรเจค สร้างเกม Endless Runner ด้วย Arduino และ จอ LCD การสร้างเกม ก็คือการเขียนโปรแกรมแบบหนึ่ง ให้แสดงผลถี่ๆ แล้วเขียนโปรแกรมให้การแสดงผลในแต่ละครั้ง ค่อยๆทำให้ตัวละครในภาพค่อยๆขยับ โดยการทำการเปลี่ยนภาพ หรือเคลื่อนที่ตัวละคร ก็จะเกิดการเคลื่อนไ…
โปรเจค IoT ESP8266 วัดอุณหภูมิ บันทึกลงดาต้าเบส MySQL
5 ปีที่ผ่านมา
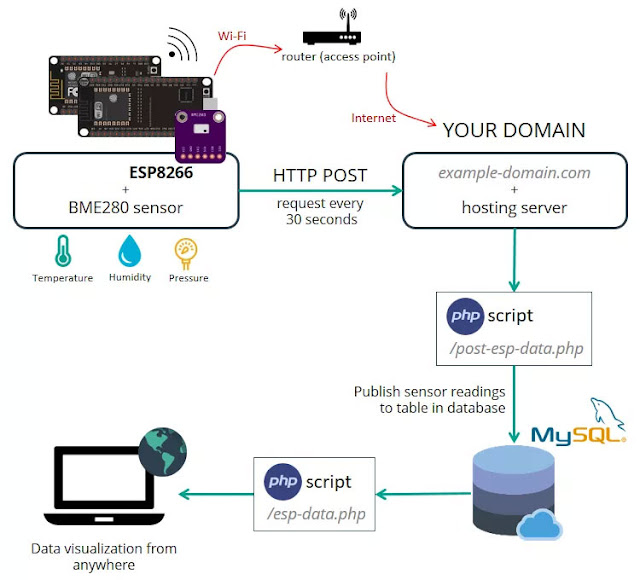
เป้าหมายของโปรเจคนี้คือเราต้องดูข้อมูลด้วยการเข้าถึงโดเมน ของเราเอง ไม่ว่าจะอยู่ส่วนไหนของโลก โดย ESP8266 จะสร้างไคลเอ็นต์ ที่ทำให้คำขอ HTTP POST ไปยังสคริปต์ PHP เพื่อแทรกข้อมูล (การอ่านเซ็นเซอร์) ลงในฐานข้อมูล MySQLโดยบทความนี้จะแสดงการส่งข้อมูลจาก…
5 ปีที่ผ่านมา
เป้าหมายของโปรเจคนี้คือเราต้องดูข้อมูลด้วยการเข้าถึงโดเมน ของเราเอง ไม่ว่าจะอยู่ส่วนไหนของโลก โดย ESP8266 จะสร้างไคลเอ็นต์ ที่ทำให้คำขอ HTTP POST ไปยังสคริปต์ PHP เพื่อแทรกข้อมูล (การอ่านเซ็นเซอร์) ลงในฐานข้อมูล MySQLโดยบทความนี้จะแสดงการส่งข้อมูลจาก…
มินิโปรเจค Arduino เปิดปิดไฟ 220V และ หรี่ไฟบ้านด้วยเสียง
5 ปีที่ผ่านมา
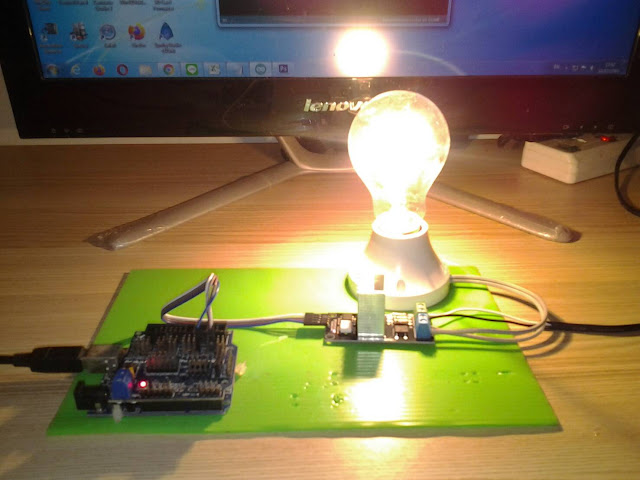
ควบคุมการติด-ดับ และ หรี่แสงสว่างหลอดไฟด้วยเสียงปรบมือ แนะนำ : ชุดประกอบสำเร็จ Arduino ควบคุมการติด-ดับ และ หรี่แสงสว่างหลอดไฟด้วยเสียงปรบมือ การทำ มินิโปรเจค Arduino เปิดปิดไฟ 220V และ หรี่ไฟบ้านด้วยเสียง เป้าหมายและหลักการทำงานของโปรเจค ต้องการควบค…
5 ปีที่ผ่านมา
ควบคุมการติด-ดับ และ หรี่แสงสว่างหลอดไฟด้วยเสียงปรบมือ แนะนำ : ชุดประกอบสำเร็จ Arduino ควบคุมการติด-ดับ และ หรี่แสงสว่างหลอดไฟด้วยเสียงปรบมือ การทำ มินิโปรเจค Arduino เปิดปิดไฟ 220V และ หรี่ไฟบ้านด้วยเสียง เป้าหมายและหลักการทำงานของโปรเจค ต้องการควบค…

โปรเจค ESP32-CAM กล้องดักถ่ายภาพอัตโนมัติ ด้วย PIR Motion
5 ปีที่ผ่านมา
โปรเจค ESP32-CAM กล้องดักถ่ายภาพอัตโนมัติ ด้วย PIR Motion โดยโปรเจคนี้ สามารถประยุกต์เป็นกล้องดักถ่ายภาพเมื่อมีผู้บุกรุก หรือเป็นกล้องดักถ่ายภาพสัตว์ มีชื่อเรียกหลายชื่อได้แก่ Trail Cam, Scout Cam, Camera Trap โดยผู้ใช้งานโดยซ่อนไว้ใกล้บริเวณทางที่สั…
5 ปีที่ผ่านมา
โปรเจค ESP32-CAM กล้องดักถ่ายภาพอัตโนมัติ ด้วย PIR Motion โดยโปรเจคนี้ สามารถประยุกต์เป็นกล้องดักถ่ายภาพเมื่อมีผู้บุกรุก หรือเป็นกล้องดักถ่ายภาพสัตว์ มีชื่อเรียกหลายชื่อได้แก่ Trail Cam, Scout Cam, Camera Trap โดยผู้ใช้งานโดยซ่อนไว้ใกล้บริเวณทางที่สั…
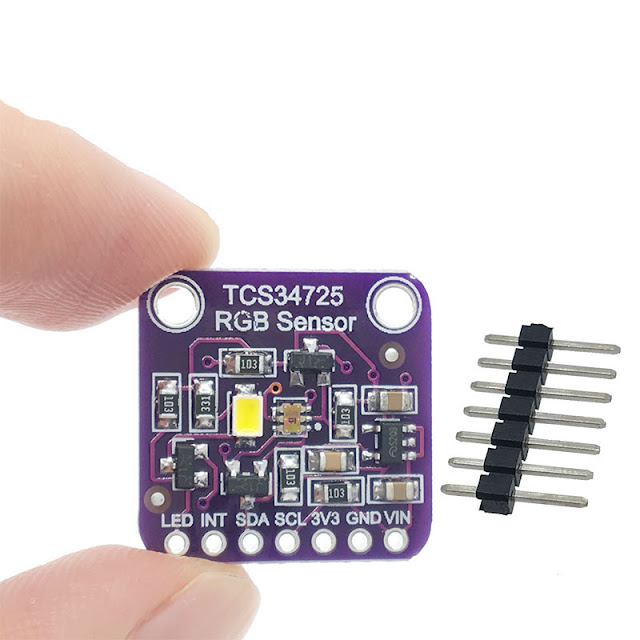
มินิโปรเจค Arduino อ่านค่าสี เล่นไฟล์เสียงจาก SD Card ออกลำโพง
6 ปีที่ผ่านมา
มินิโปรเจค Arduino อ่านค่าสี เล่นไฟล์เสียงจาก SD Card ออกลำโพง โปรเจค Arduino พูดโต้ตอบได้ โดยการเล่นไฟล์เสียงจาก SD Card บทความนี้จะสอนใช้งาน Arduino เล่นไฟล์เสียงจาก SD Card ออกลำโพง เราสามารถอัดเสียงพูดหรือบันทึกเสียงเพลงลง SD Card แล้ว สั่งงานให้…
6 ปีที่ผ่านมา
มินิโปรเจค Arduino อ่านค่าสี เล่นไฟล์เสียงจาก SD Card ออกลำโพง โปรเจค Arduino พูดโต้ตอบได้ โดยการเล่นไฟล์เสียงจาก SD Card บทความนี้จะสอนใช้งาน Arduino เล่นไฟล์เสียงจาก SD Card ออกลำโพง เราสามารถอัดเสียงพูดหรือบันทึกเสียงเพลงลง SD Card แล้ว สั่งงานให้…
 โรบอทสยาม อุปกรณ์หุ่นยนต์ Arduino
สมัครสมาชิกร้านนี้ เพื่อรับสิทธิพิเศษ


▲
▼
รายการสั่งซื้อของฉัน
รายการสั่งซื้อของฉัน
ข้อมูลร้านค้านี้

โรบอทสยาม อุปกรณ์หุ่นยนต์ Arduino
จําหน่าย อุปกรณ์หุ่นยนต์ Arduino , ESP8266, ESP32 , STM32 , micro:bit , Paspberry Pi รับประกอบหุ่นยนต์ ชุดคิทหุ่นยนต์ ตัวอย่างโปรเจค IoT (Internet of Things) อินเทอร์เน็ตของสรรพสิ่ง
เบอร์โทร : 095-226-2116
อีเมล : robotsiam16@gmail.com
อีเมล : robotsiam16@gmail.com
ส่งข้อความติดต่อร้าน
เกี่ยวกับร้านค้านี้
ค้นหาสินค้าในร้านนี้
ค้นหาสินค้า
สินค้าที่ดูล่าสุด
บันทึกเป็นร้านโปรด
Join เป็นสมาชิกร้าน
แชร์หน้านี้
แชร์หน้านี้
↑
TOP เลื่อนขึ้นบนสุด
TOP เลื่อนขึ้นบนสุด
สินค้าในตะกร้า ({{total_num}} รายการ)

ขออภัย ขณะนี้ยังไม่มีสินค้าในตะกร้า
ราคาสินค้าทั้งหมด
฿ {{price_format(total_price)}}
- ฿ {{price_format(discount.price)}}
ราคาสินค้าทั้งหมด
{{total_quantity}} ชิ้น
฿ {{price_format(after_product_price)}}
ราคาไม่รวมค่าจัดส่ง
➜ เลือกซื้อสินค้าเพิ่ม